> ## Documentation Index
> Fetch the complete documentation index at: https://bruno-a6972042-mintlify-53b1251c.mintlify.site/llms.txt
> Use this file to discover all available pages before exploring further.
# Okta SCIM provisioning with Bruno
This guide will walk you through setting up SCIM (System for Cross-domain Identity Management) provisioning with Bruno using Okta SWA (Secure Web Authentication).
**Prerequisites**: Before configuring Okta, you must first enable SCIM provisioning in Bruno and generate an API key. Follow the [Enabling SCIM Provisioning](./overview#enabling-scim-provisioning) section in the overview page to complete this setup and save your API key for use in the steps below.
## Create your Okta App
**Already have an Okta App for SSO?** If you previously set up a Bruno Okta application for [SAML SSO](../saml-sso/configure-saml-sso-with-okta), you can reuse it for SCIM provisioning. Skip to the [Configure your Okta App](#configure-your-okta-app) section to add provisioning to your existing application.
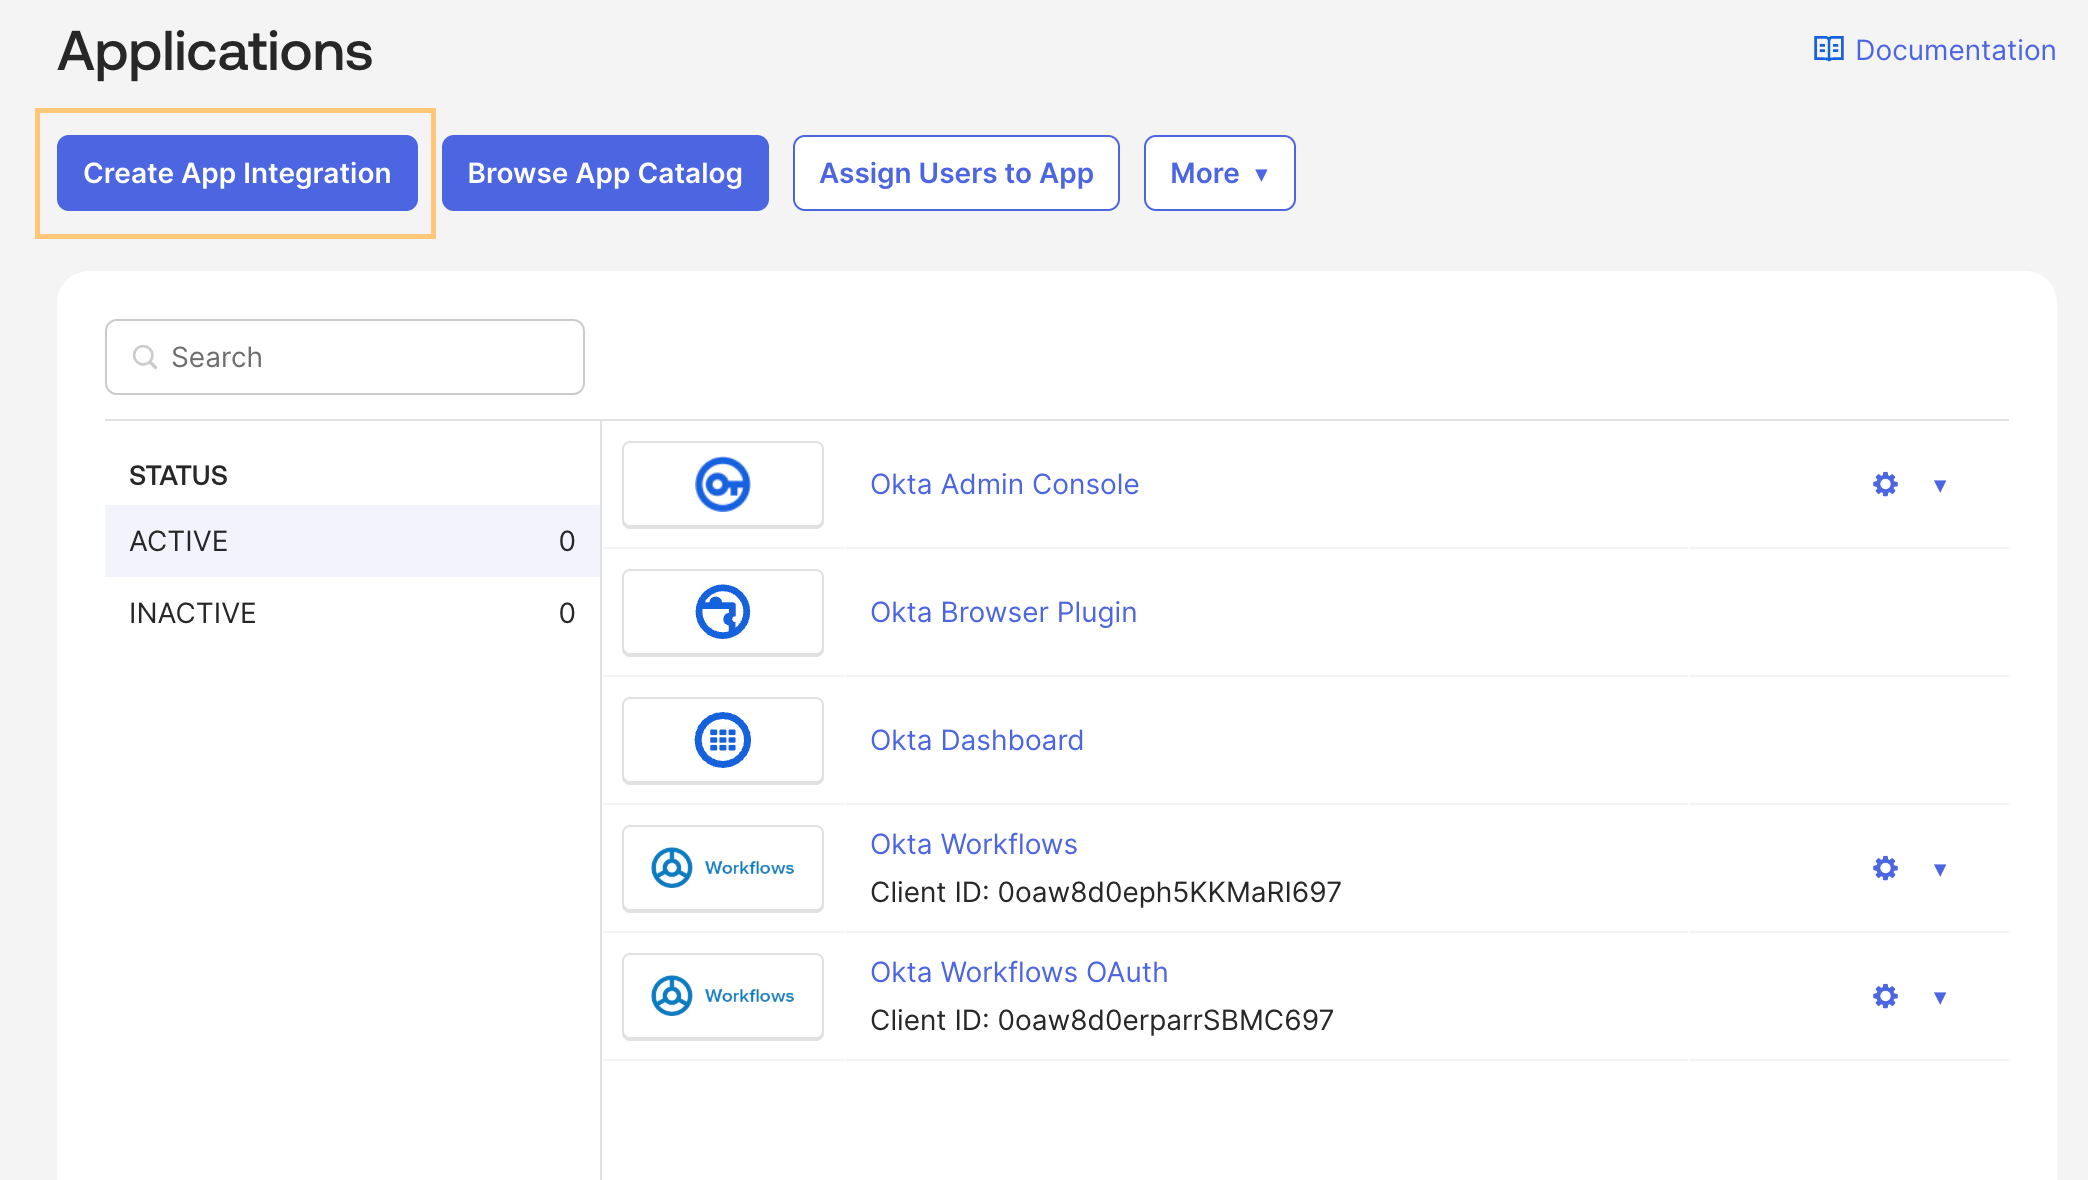
1. As an Okta admin, navigate to **Applications** and click **Create App Integration**
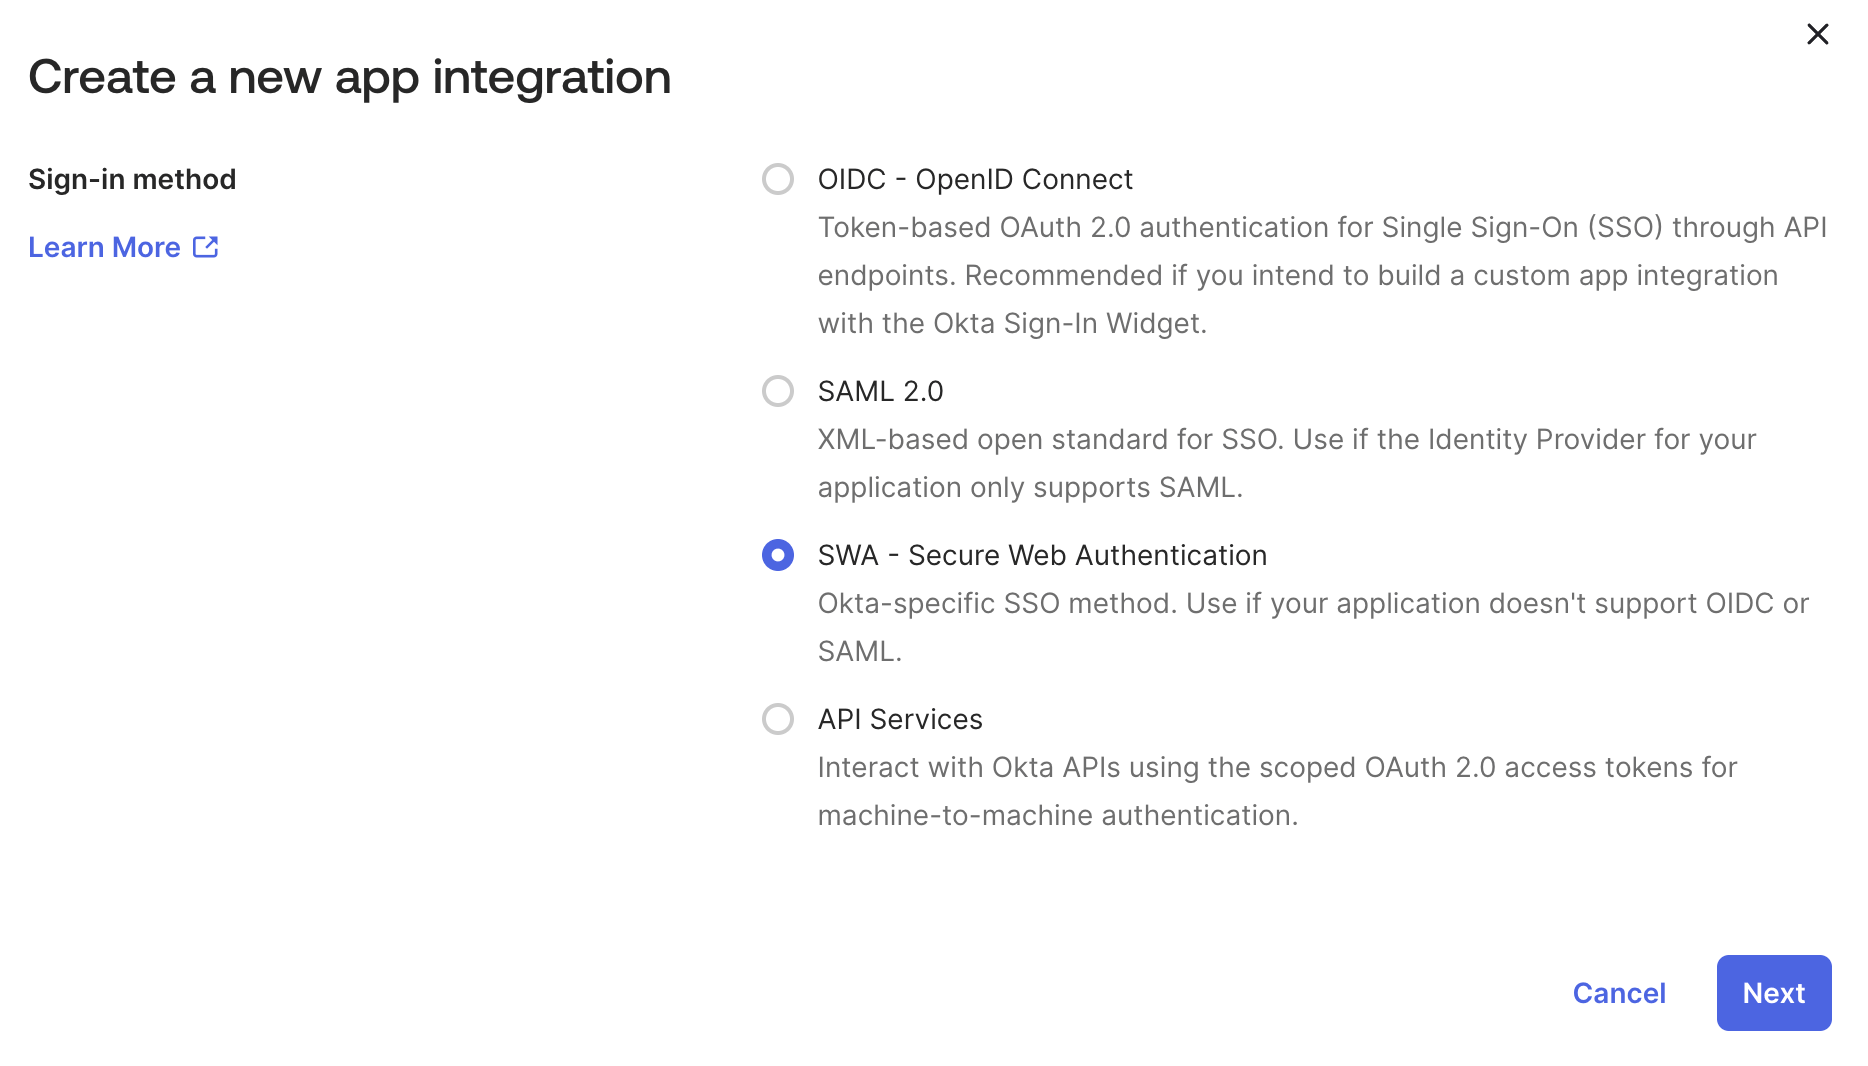
 2. Select **SWA - Secure Web Authentication** and click **Next**
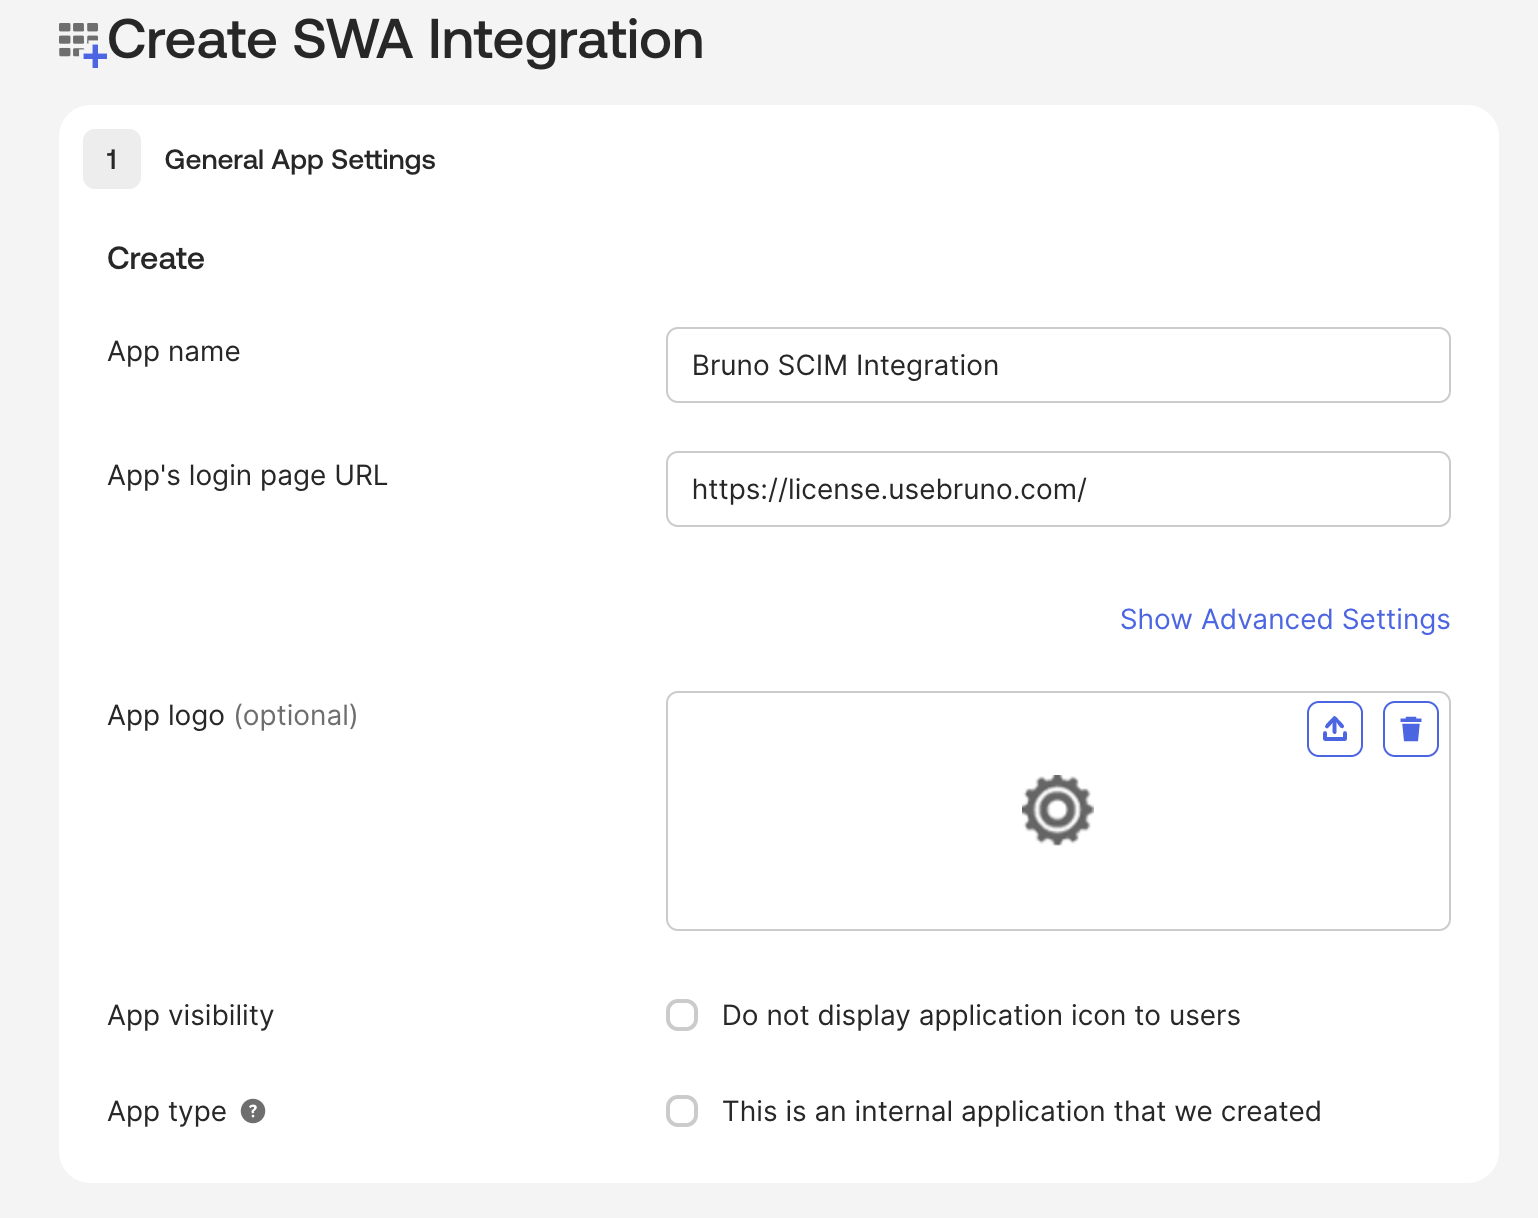
 3. On the **Create SWA Integration** page, add the following values and click **Finish**:
* **App name**: (Unique App Name - e.g. Bruno SCIM Integration)
* **App's login page URL**: `https://license.usebruno.com/`
3. On the **Create SWA Integration** page, add the following values and click **Finish**:
* **App name**: (Unique App Name - e.g. Bruno SCIM Integration)
* **App's login page URL**: `https://license.usebruno.com/`
 ## Configure your Okta App
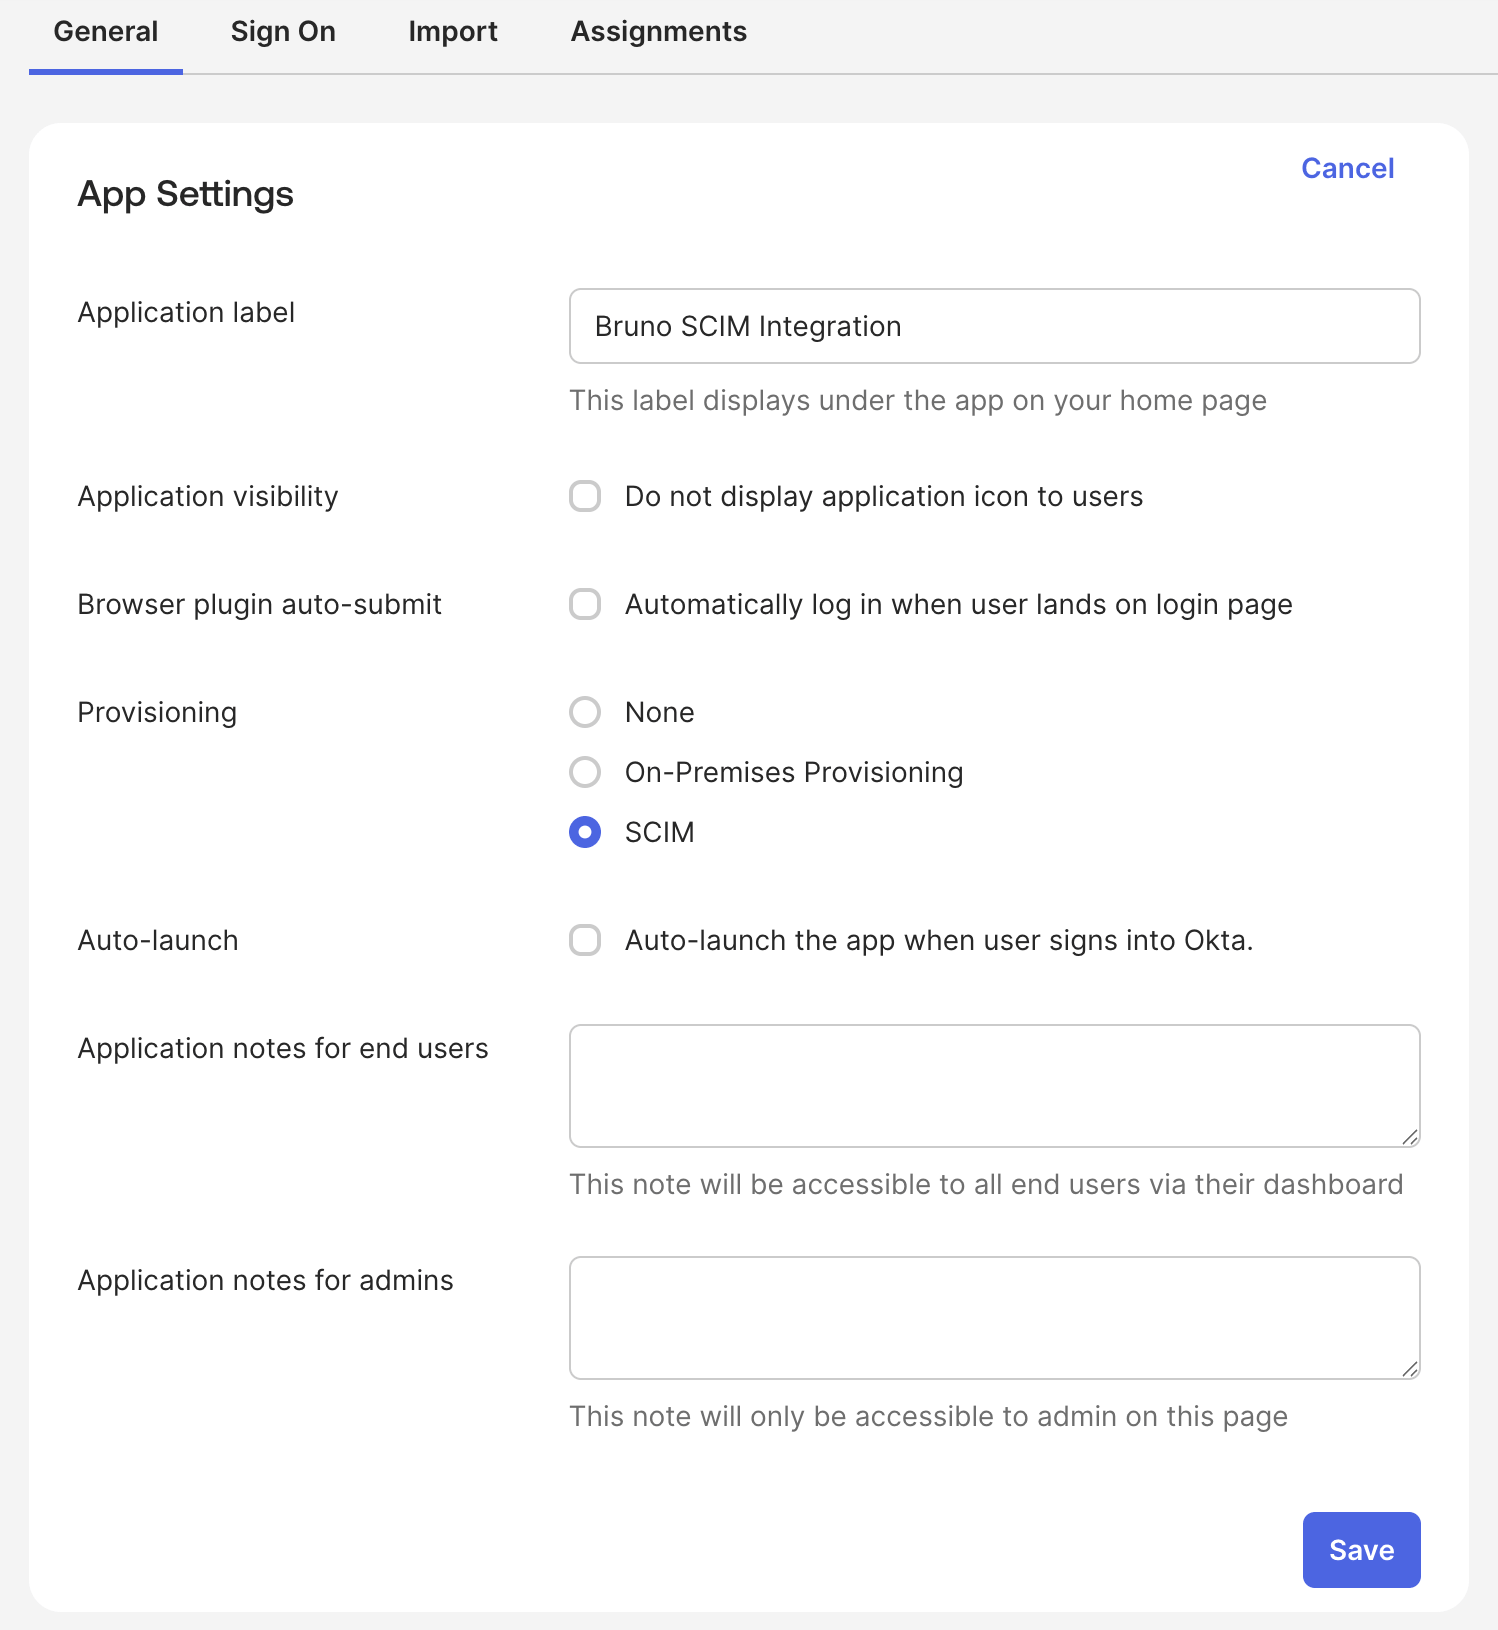
1. On your newly created application page, select the **General** tab
2. Under **App Settings**, select **Edit**, and check the **Provisioning** option **SCIM** and click **Save**
## Configure your Okta App
1. On your newly created application page, select the **General** tab
2. Under **App Settings**, select **Edit**, and check the **Provisioning** option **SCIM** and click **Save**
 3. Return to your Okta app, select the **Provisioning** tab, under **SCIM Connection** select **Edit** and configure the following values:
* **SCIM connector base URL**: `https://license.usebruno.com/scim/v2`
* **Unique identifier field for users**: `email`
* **Supported provisioning actions**: Check the following options:
* `Import New Users and Profile Updates`
* `Push New Users`
* `Push Profile Updates`
* `Push Groups`
* **Authentication**: set to **HTTP Header**
* Under **HTTP Header**, for **token**: add the generated API Key value from the [prerequisites step](./overview#enabling-scim-provisioning)
3. Return to your Okta app, select the **Provisioning** tab, under **SCIM Connection** select **Edit** and configure the following values:
* **SCIM connector base URL**: `https://license.usebruno.com/scim/v2`
* **Unique identifier field for users**: `email`
* **Supported provisioning actions**: Check the following options:
* `Import New Users and Profile Updates`
* `Push New Users`
* `Push Profile Updates`
* `Push Groups`
* **Authentication**: set to **HTTP Header**
* Under **HTTP Header**, for **token**: add the generated API Key value from the [prerequisites step](./overview#enabling-scim-provisioning)
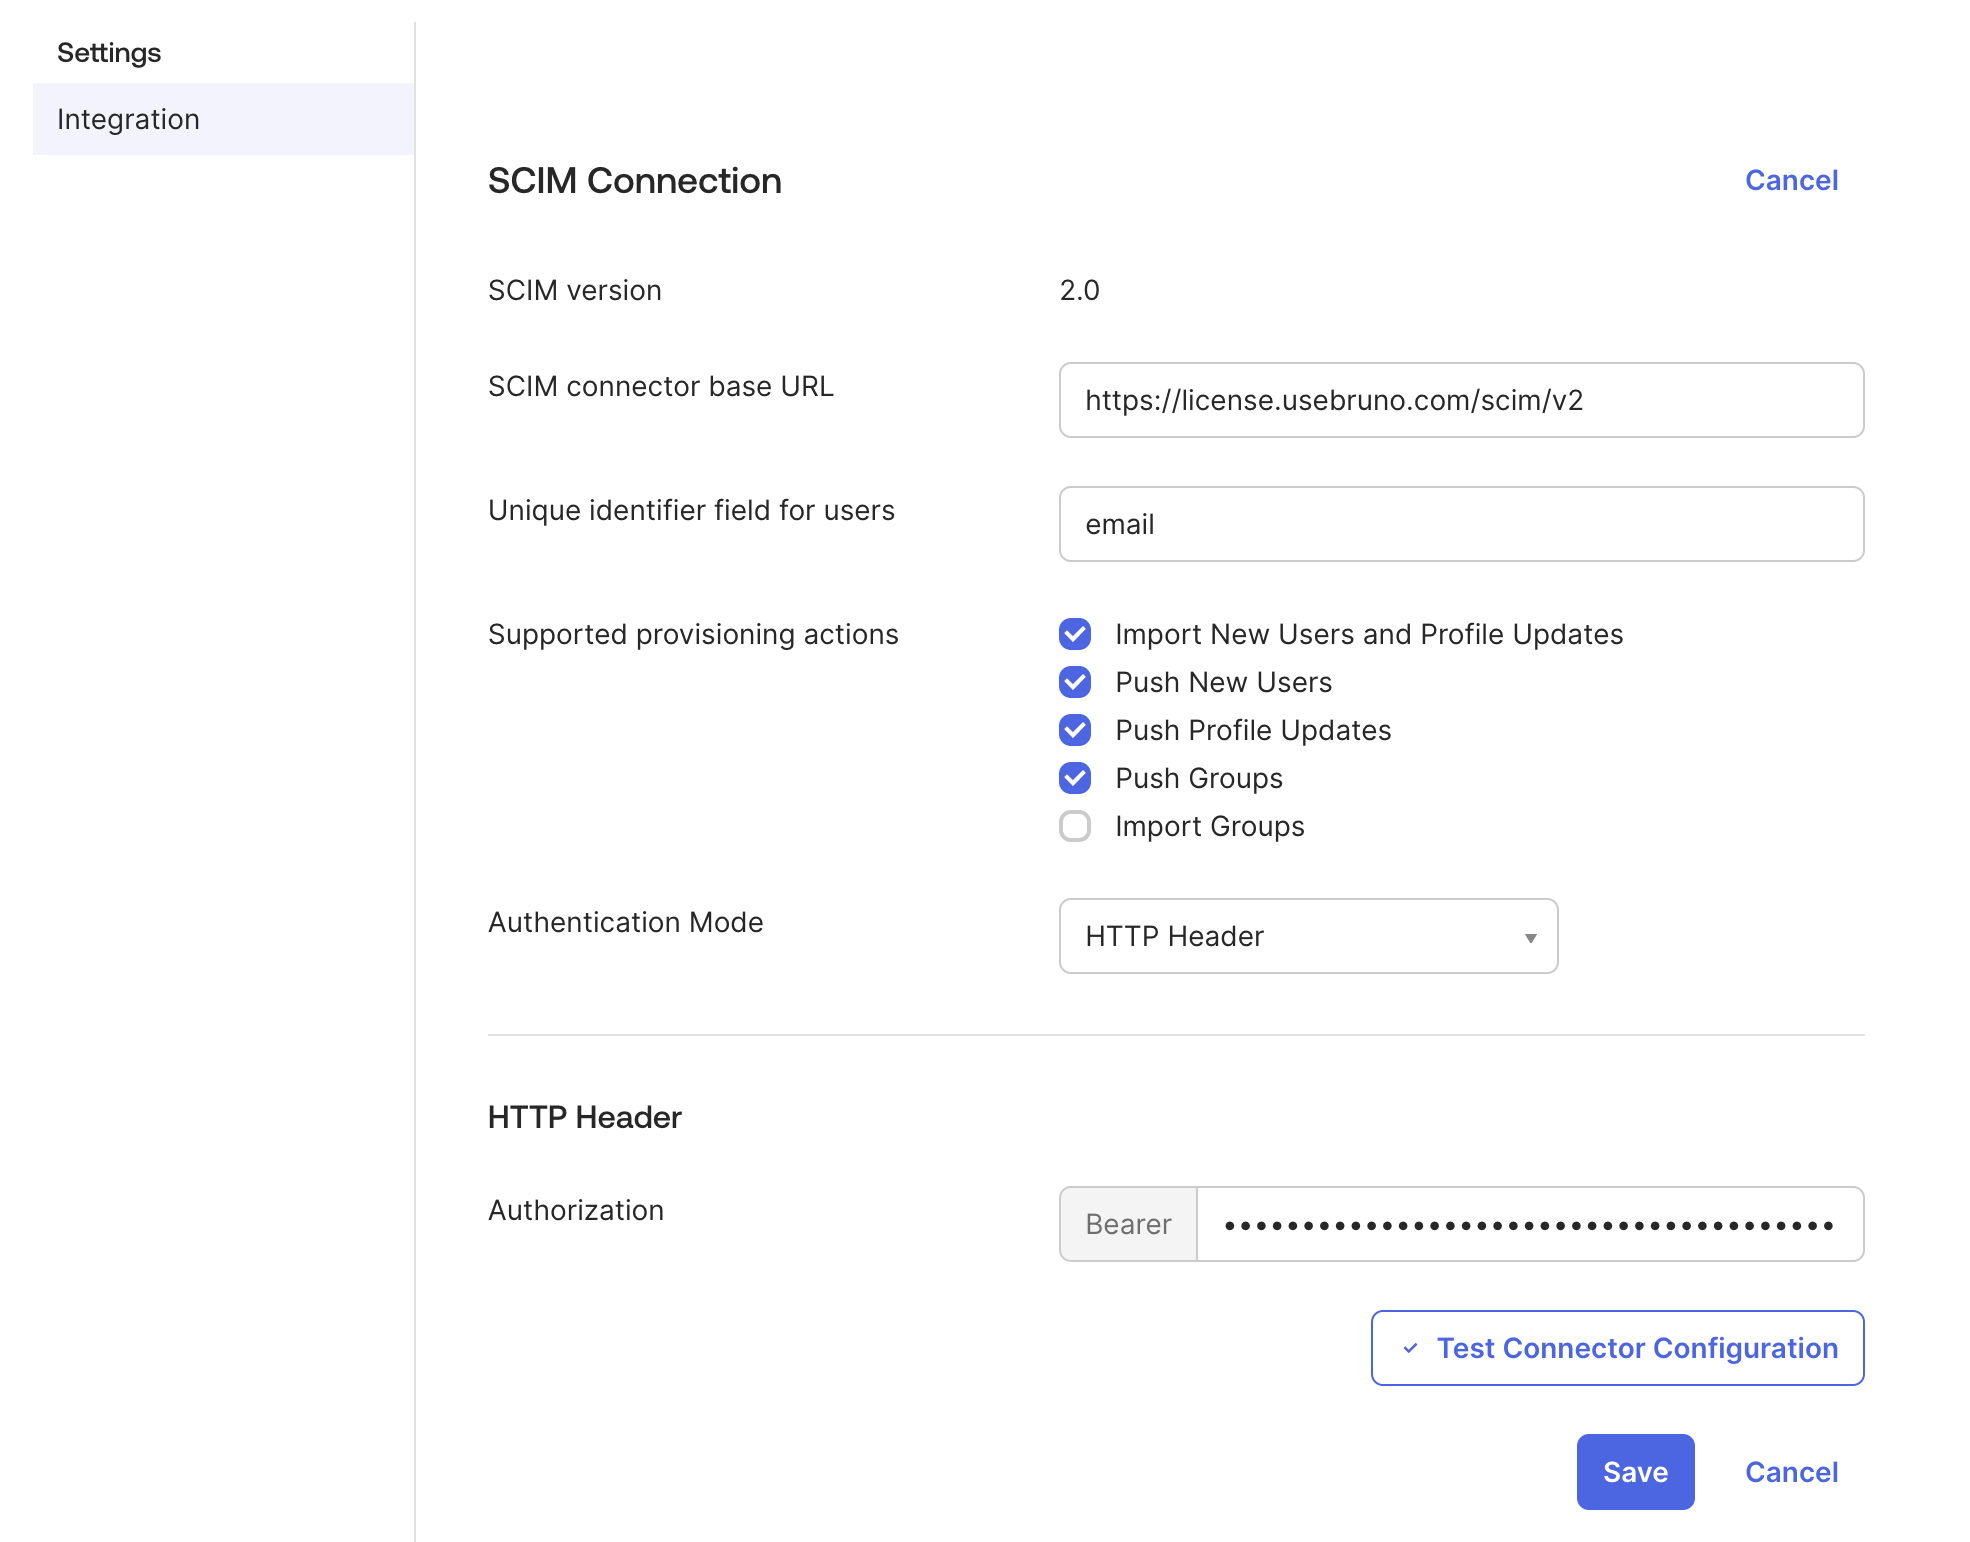 4. Click **Test Connector Configuration**. If successful, a **Connector configured successfully** message dialogue appears.
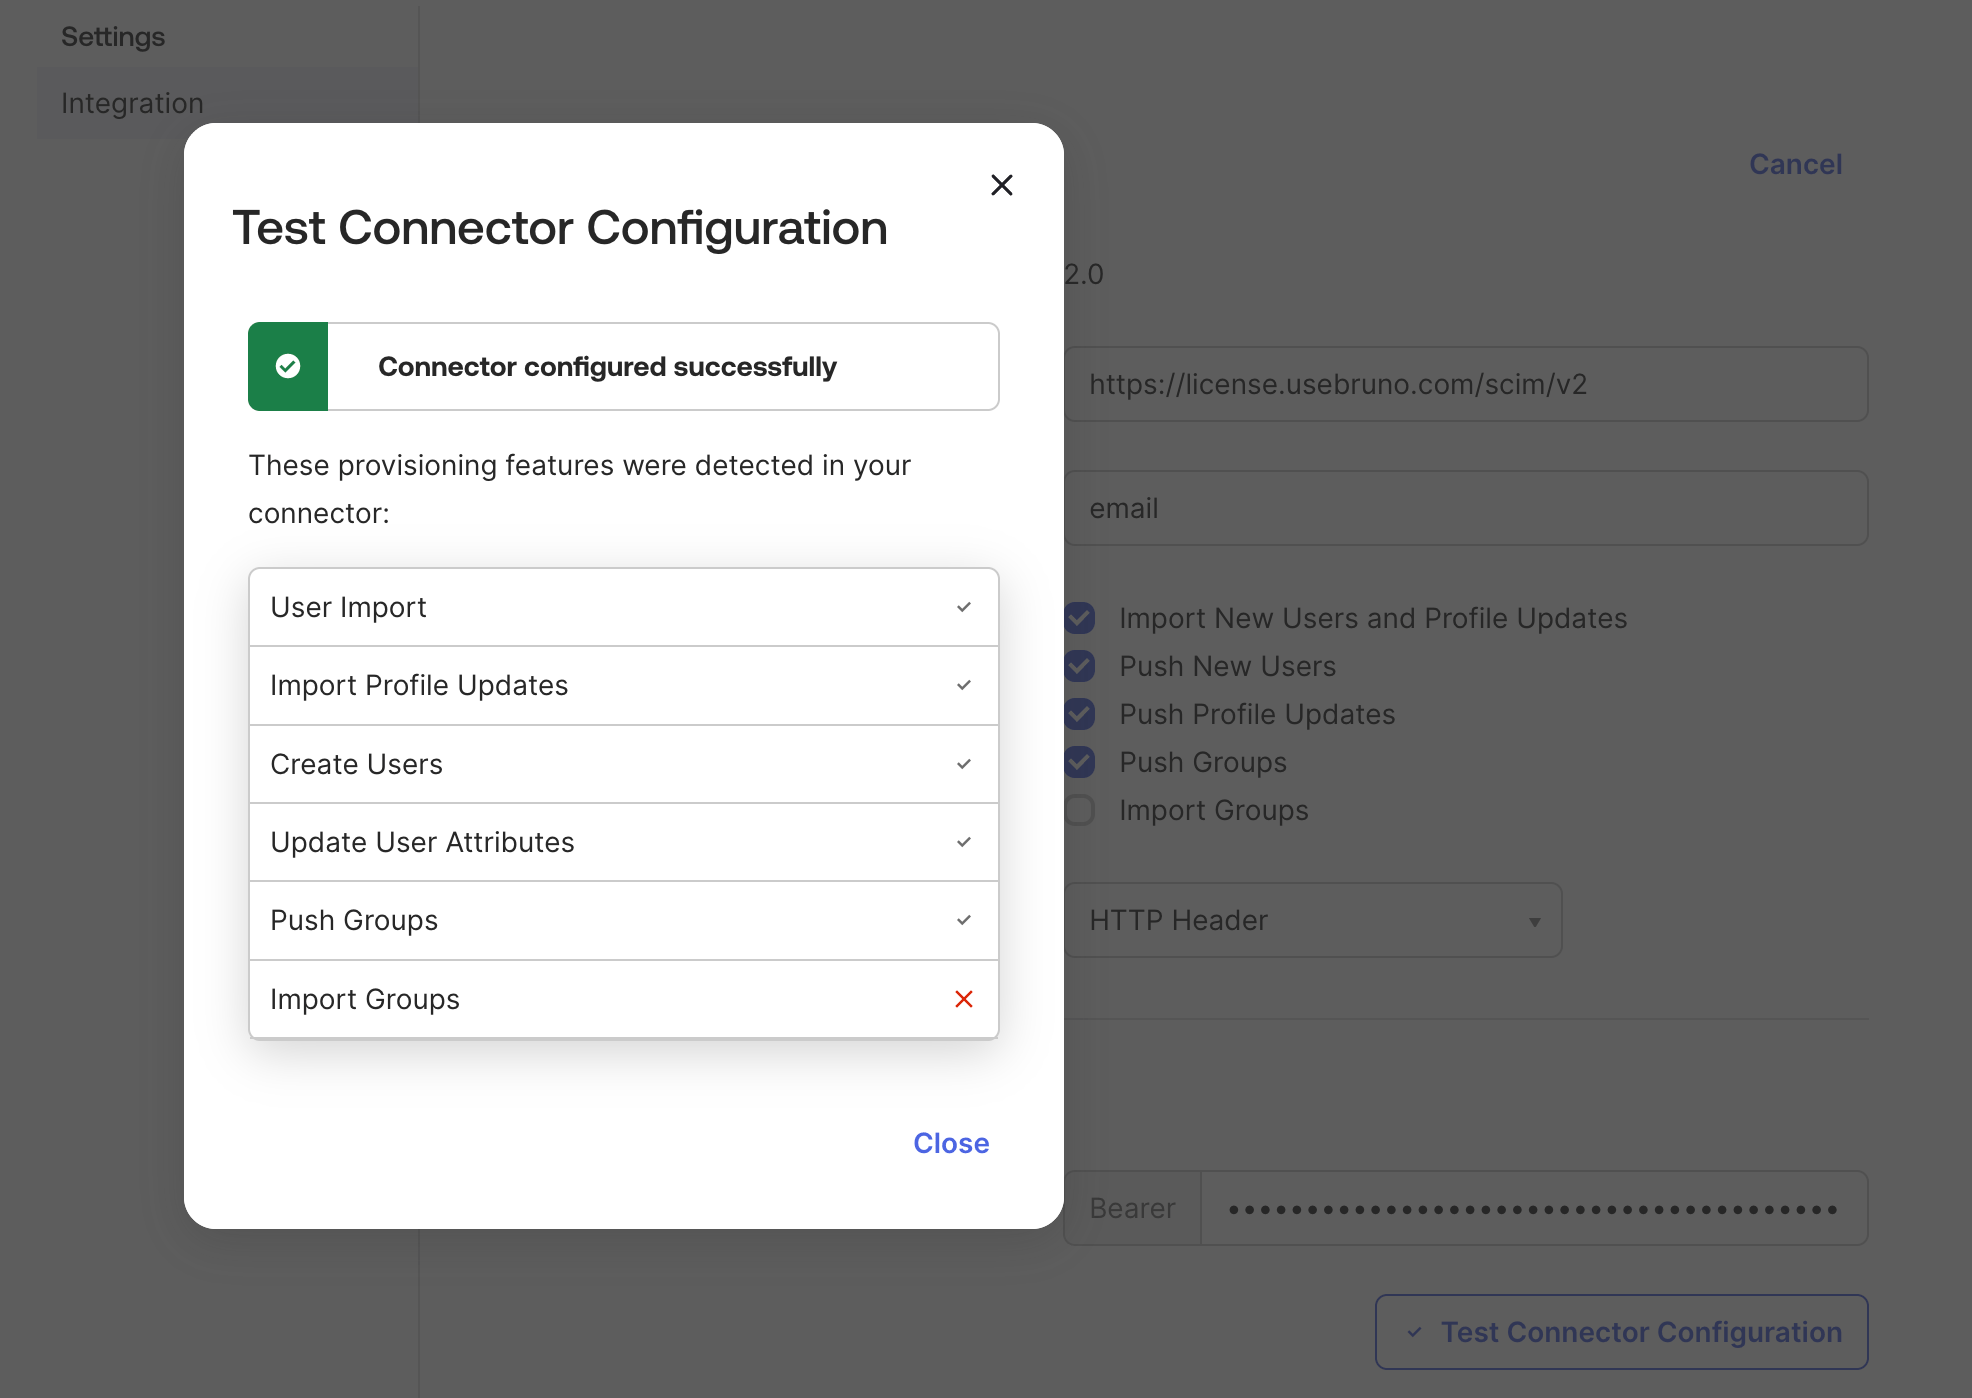 5. Click **Save** to complete the Provisioning integration.
6. Under the **Provisioning** tab, select the **To Apps** setting, edit and enable the following options and click **Save**:
* `Create Users`
* `Update User Attributes`
* `Deactivate Users`
5. Click **Save** to complete the Provisioning integration.
6. Under the **Provisioning** tab, select the **To Apps** setting, edit and enable the following options and click **Save**:
* `Create Users`
* `Update User Attributes`
* `Deactivate Users`
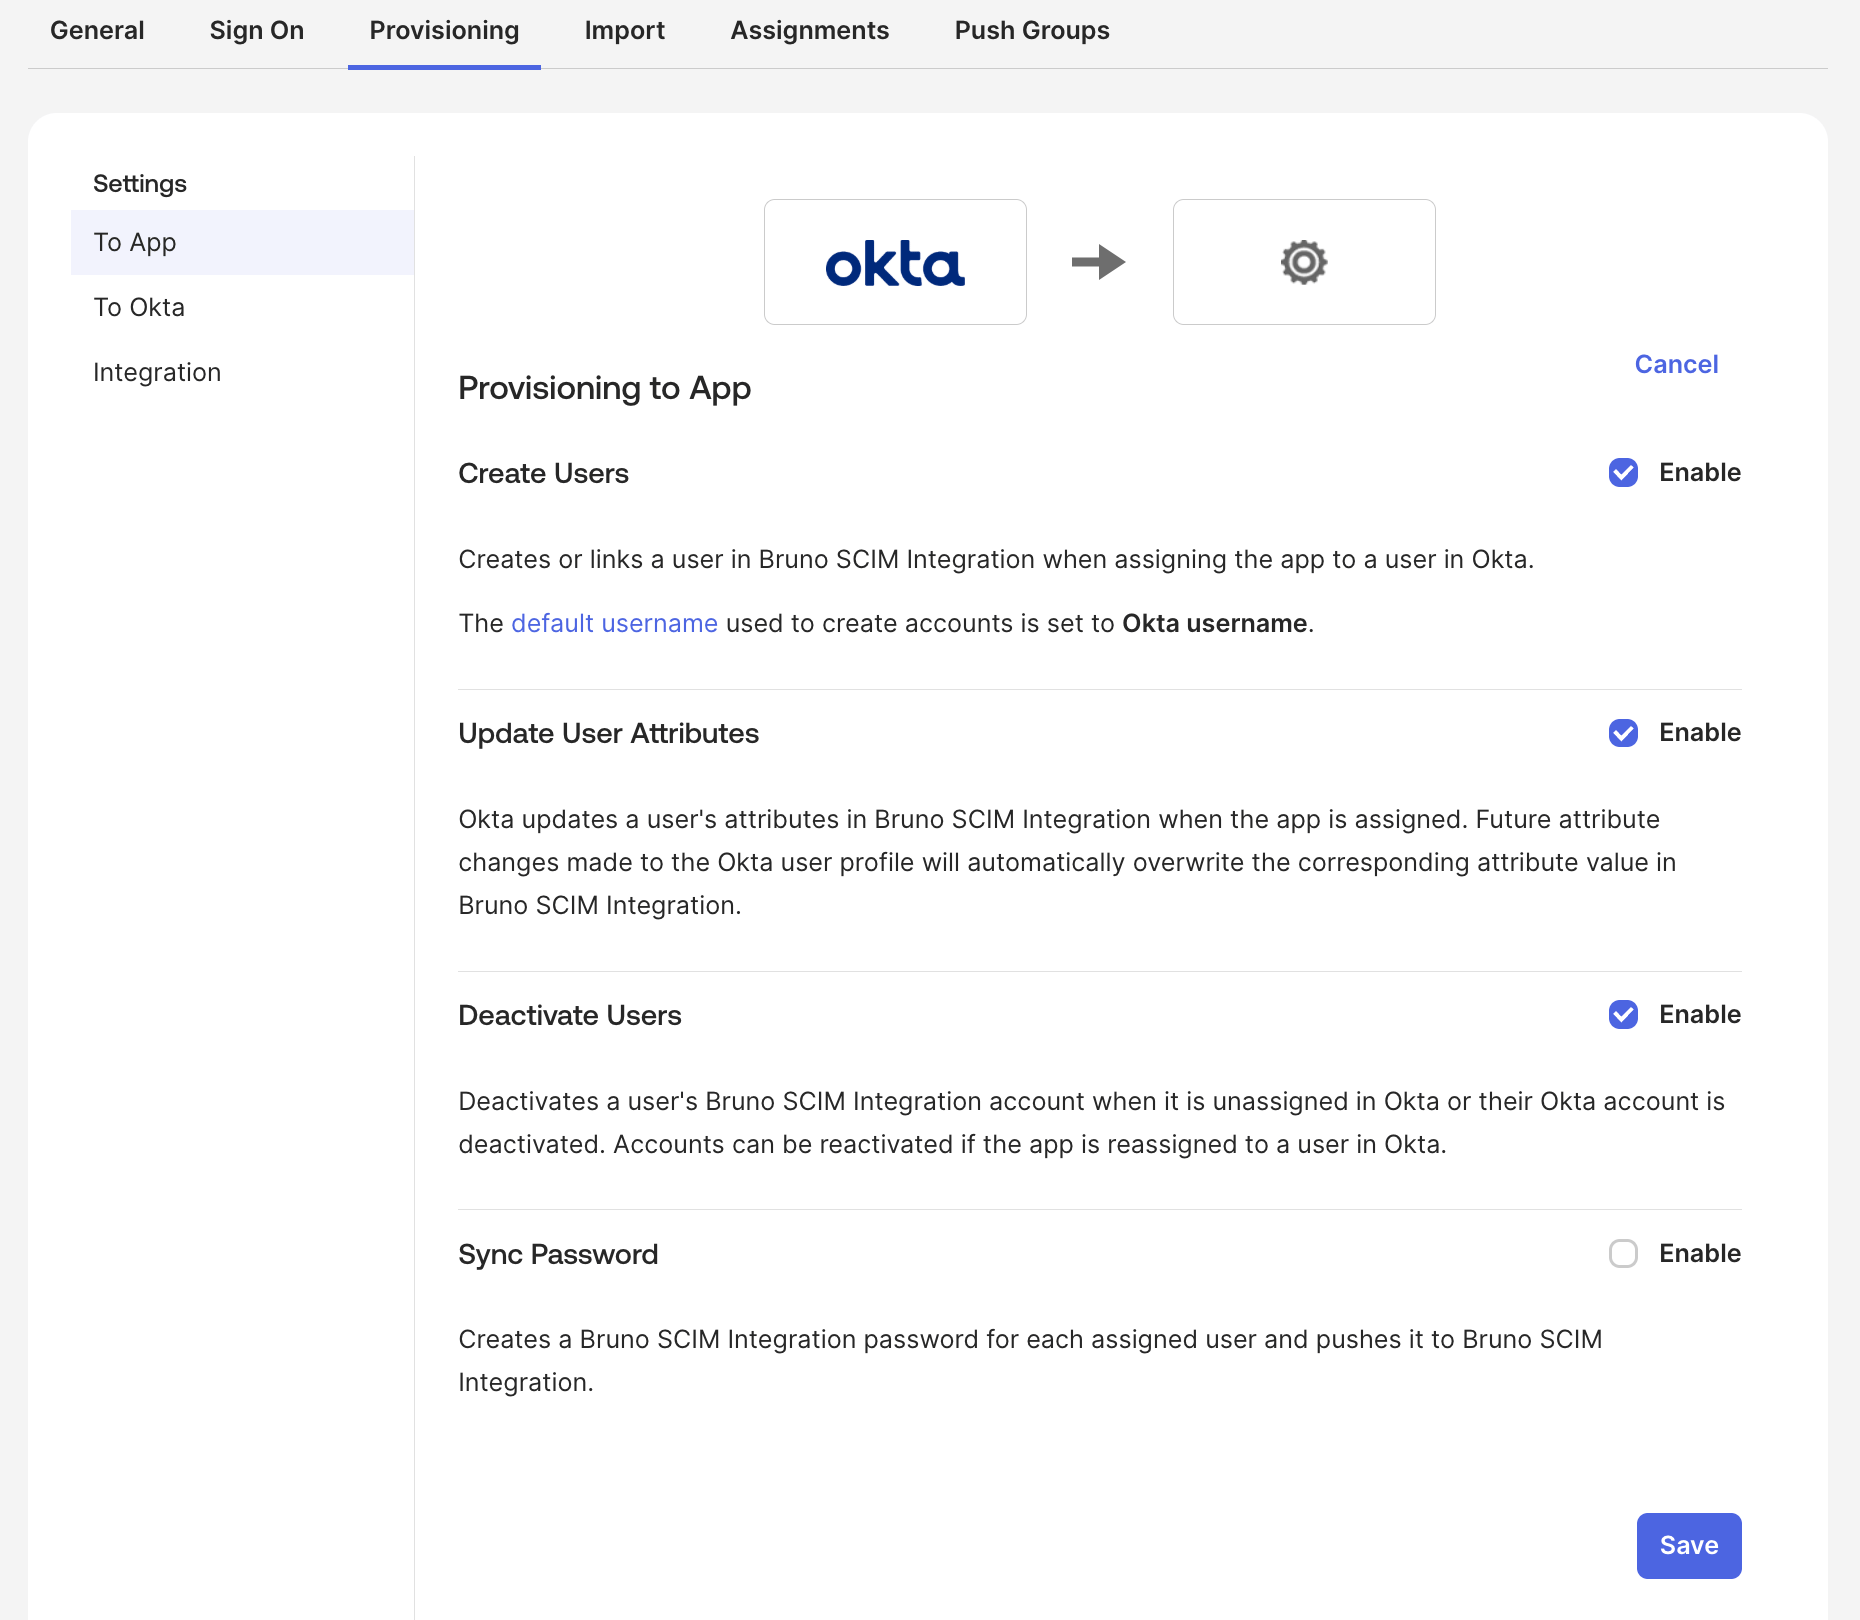 Your SCIM integration is now complete. You can now begin [assigning users to Bruno](#assign-people-and-groups-to-bruno-in-okta).
## Configure Admin Role Mapping
Admin Role Mapping lets you provision specific Okta users as Bruno License Manager admins. Admins provisioned this way get portal access, do **not** consume a license seat, and do **not** appear in the Users list.
This section is optional. Skip it if you only want to provision regular licensed users.
**The admin role must be present on the first provisioning call.** Bruno decides whether a user is an administrator or a licensed user at the moment the account is created, based on whether a matching role is included in that request.
If a user is created before their role value is available, they are provisioned as a licensed user and consume a license seat. A role arriving in a later update promotes them to administrator, but the license already issued remains in place — Bruno does not revoke a license that has been issued, so that users already working in Bruno desktop are never cut off.
Role values are matched **exactly** and are **case-sensitive**. If Okta sends `admin`, the Admin Role Mapping in Bruno must contain `admin` — not `Admin` or `ADMIN`. Multiple values are supported as a comma-separated list, and a match against any one grants administrator access.
Administrators provisioned via SCIM do not appear in the **Users** list, because they do not hold a license. They appear under **Settings → Admins**.
Unlike Entra ID, Okta has no built-in App Roles concept for custom SCIM apps, so the role is carried in a `roles` attribute on your Bruno app's profile.
### Add a roles attribute to your Bruno app's profile
1. Go to your Bruno SCIM app → **Provisioning** → **To App**, click **Go to Profile Editor**
2. Click **Add Attribute**
3. Fill in:
* **Data type**: `string`
* **Display name**: `Roles`
* **Variable name**: `roles`
4. Click **Save**
Your SCIM integration is now complete. You can now begin [assigning users to Bruno](#assign-people-and-groups-to-bruno-in-okta).
## Configure Admin Role Mapping
Admin Role Mapping lets you provision specific Okta users as Bruno License Manager admins. Admins provisioned this way get portal access, do **not** consume a license seat, and do **not** appear in the Users list.
This section is optional. Skip it if you only want to provision regular licensed users.
**The admin role must be present on the first provisioning call.** Bruno decides whether a user is an administrator or a licensed user at the moment the account is created, based on whether a matching role is included in that request.
If a user is created before their role value is available, they are provisioned as a licensed user and consume a license seat. A role arriving in a later update promotes them to administrator, but the license already issued remains in place — Bruno does not revoke a license that has been issued, so that users already working in Bruno desktop are never cut off.
Role values are matched **exactly** and are **case-sensitive**. If Okta sends `admin`, the Admin Role Mapping in Bruno must contain `admin` — not `Admin` or `ADMIN`. Multiple values are supported as a comma-separated list, and a match against any one grants administrator access.
Administrators provisioned via SCIM do not appear in the **Users** list, because they do not hold a license. They appear under **Settings → Admins**.
Unlike Entra ID, Okta has no built-in App Roles concept for custom SCIM apps, so the role is carried in a `roles` attribute on your Bruno app's profile.
### Add a roles attribute to your Bruno app's profile
1. Go to your Bruno SCIM app → **Provisioning** → **To App**, click **Go to Profile Editor**
2. Click **Add Attribute**
3. Fill in:
* **Data type**: `string`
* **Display name**: `Roles`
* **Variable name**: `roles`
4. Click **Save**
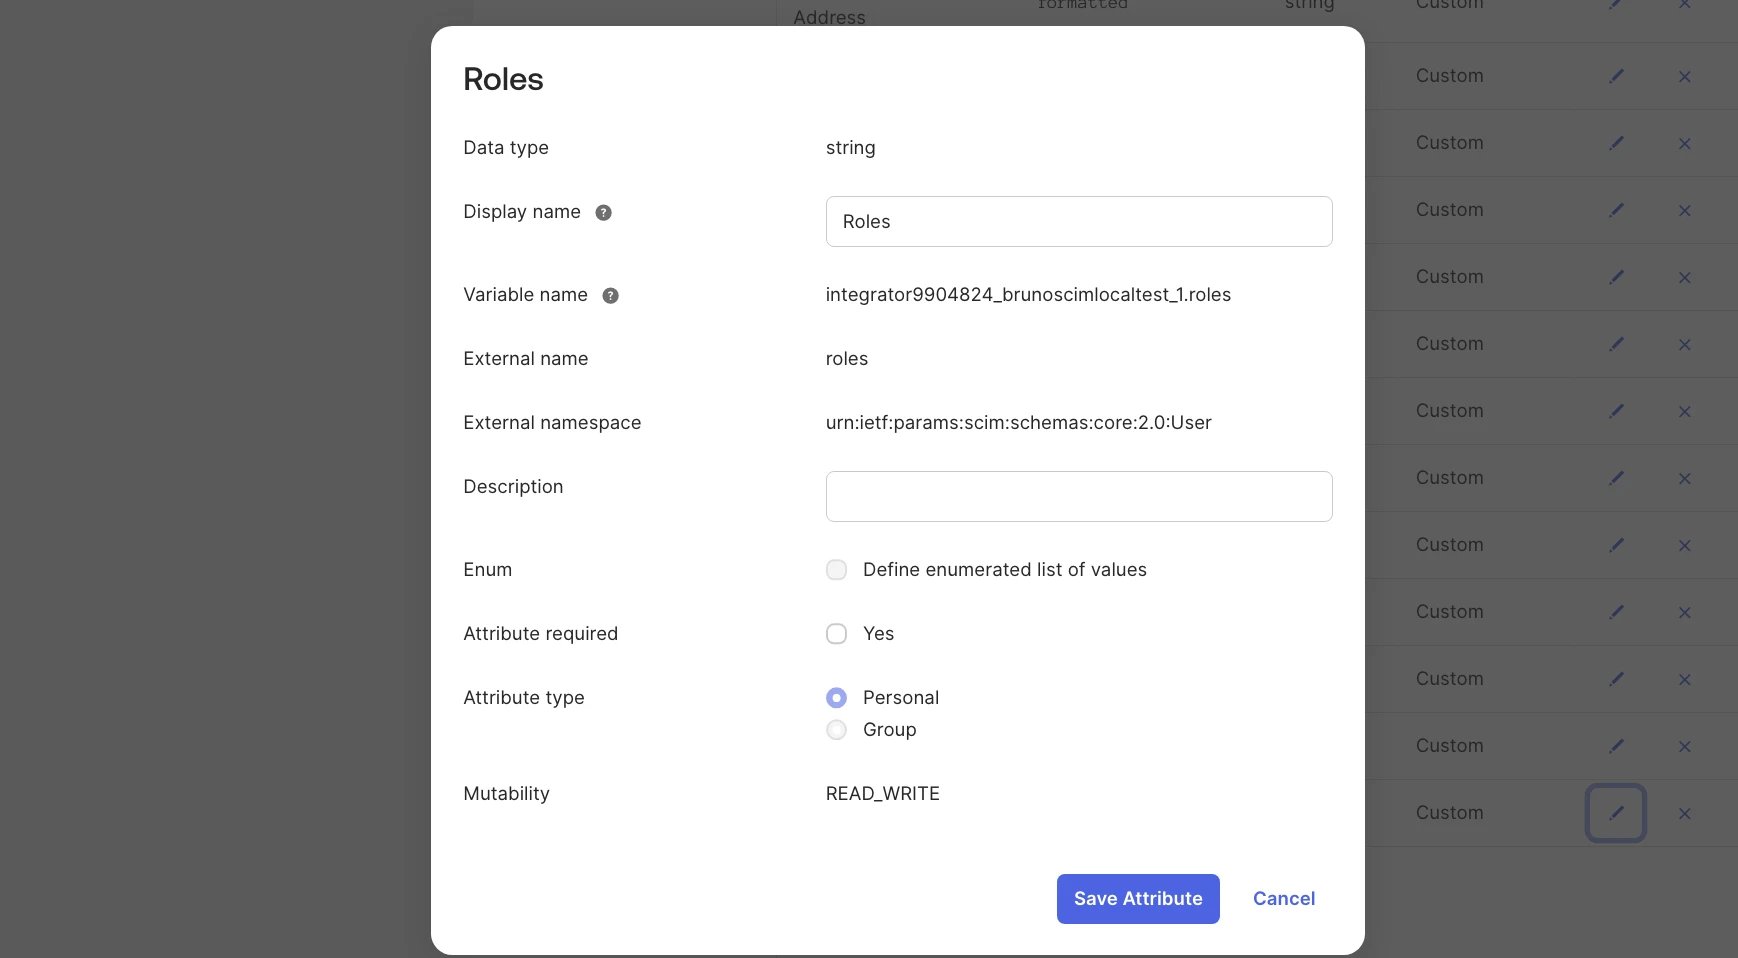 Okta may default this attribute's namespace to something app-specific instead of the base SCIM schema, which causes it to be sent nested (e.g. `"roles": {"roles": "..."}`) instead of as a flat field, and Bruno won't recognize it. If this happens, use the Okta API to set this attribute's `externalNamespace` to `urn:ietf:params:scim:schemas:core:2.0:User` (matching the other built-in attributes like `givenName`), the same namespace already used by attributes such as `givenName` or `locale` on this profile.
### Choosing how to send the role
The role value must reach Bruno in the same request that creates the user. Two approaches:
#### Option A: Resolve from group membership (recommended)
Have Okta evaluate the role at the moment it pushes to Bruno, rather than reading a stored profile attribute.
1. Create an Okta group for your Bruno administrators (e.g. `Bruno - Admin`)
2. In your Bruno app, go to **Provisioning** → **To App** → **Attribute Mappings**
3. Edit the `roles` attribute and set the value expression to:
```
isMemberOfGroupName("Bruno - Admin") ? "admin" : ""
```
4. Set **Apply on** to **Create and update**
5. Save
Group membership is known at push time, so the role is always present when the account is created. Substitute your own group name and role value, and make the role value match your Admin Role Mapping in Bruno exactly.
#### Option B: Read a stored profile attribute
Map the `roles` attribute to a custom attribute on the user's Okta profile (for example `user.brunoLicenseRole`), populated per user or by a group rule.
**Set the attribute value before assigning the user to the app.** Okta pushes the account creation as soon as the assignment is made, and schedules profile attribute updates separately. If the same group both populates the attribute and grants the app assignment, the account can be created before the attribute value resolves — and the user is provisioned as a licensed user instead of an administrator.
If you are driving both from one group, use Option A instead.
**1. Add a custom attribute to the Okta user profile**
1. Go to **Directory** → **Profile Editor**
2. Select **Okta** (the default/base user profile, not this app's own profile)
3. Click **Add Attribute**
4. Fill in:
* **Data type**: `string`
* **Display name**: `Bruno License Role`
* **Variable name**: `brunoLicenseRole`
* **Attribute type**: `Personal`
5. Click **Save**
Okta may default this attribute's namespace to something app-specific instead of the base SCIM schema, which causes it to be sent nested (e.g. `"roles": {"roles": "..."}`) instead of as a flat field, and Bruno won't recognize it. If this happens, use the Okta API to set this attribute's `externalNamespace` to `urn:ietf:params:scim:schemas:core:2.0:User` (matching the other built-in attributes like `givenName`), the same namespace already used by attributes such as `givenName` or `locale` on this profile.
### Choosing how to send the role
The role value must reach Bruno in the same request that creates the user. Two approaches:
#### Option A: Resolve from group membership (recommended)
Have Okta evaluate the role at the moment it pushes to Bruno, rather than reading a stored profile attribute.
1. Create an Okta group for your Bruno administrators (e.g. `Bruno - Admin`)
2. In your Bruno app, go to **Provisioning** → **To App** → **Attribute Mappings**
3. Edit the `roles` attribute and set the value expression to:
```
isMemberOfGroupName("Bruno - Admin") ? "admin" : ""
```
4. Set **Apply on** to **Create and update**
5. Save
Group membership is known at push time, so the role is always present when the account is created. Substitute your own group name and role value, and make the role value match your Admin Role Mapping in Bruno exactly.
#### Option B: Read a stored profile attribute
Map the `roles` attribute to a custom attribute on the user's Okta profile (for example `user.brunoLicenseRole`), populated per user or by a group rule.
**Set the attribute value before assigning the user to the app.** Okta pushes the account creation as soon as the assignment is made, and schedules profile attribute updates separately. If the same group both populates the attribute and grants the app assignment, the account can be created before the attribute value resolves — and the user is provisioned as a licensed user instead of an administrator.
If you are driving both from one group, use Option A instead.
**1. Add a custom attribute to the Okta user profile**
1. Go to **Directory** → **Profile Editor**
2. Select **Okta** (the default/base user profile, not this app's own profile)
3. Click **Add Attribute**
4. Fill in:
* **Data type**: `string`
* **Display name**: `Bruno License Role`
* **Variable name**: `brunoLicenseRole`
* **Attribute type**: `Personal`
5. Click **Save**
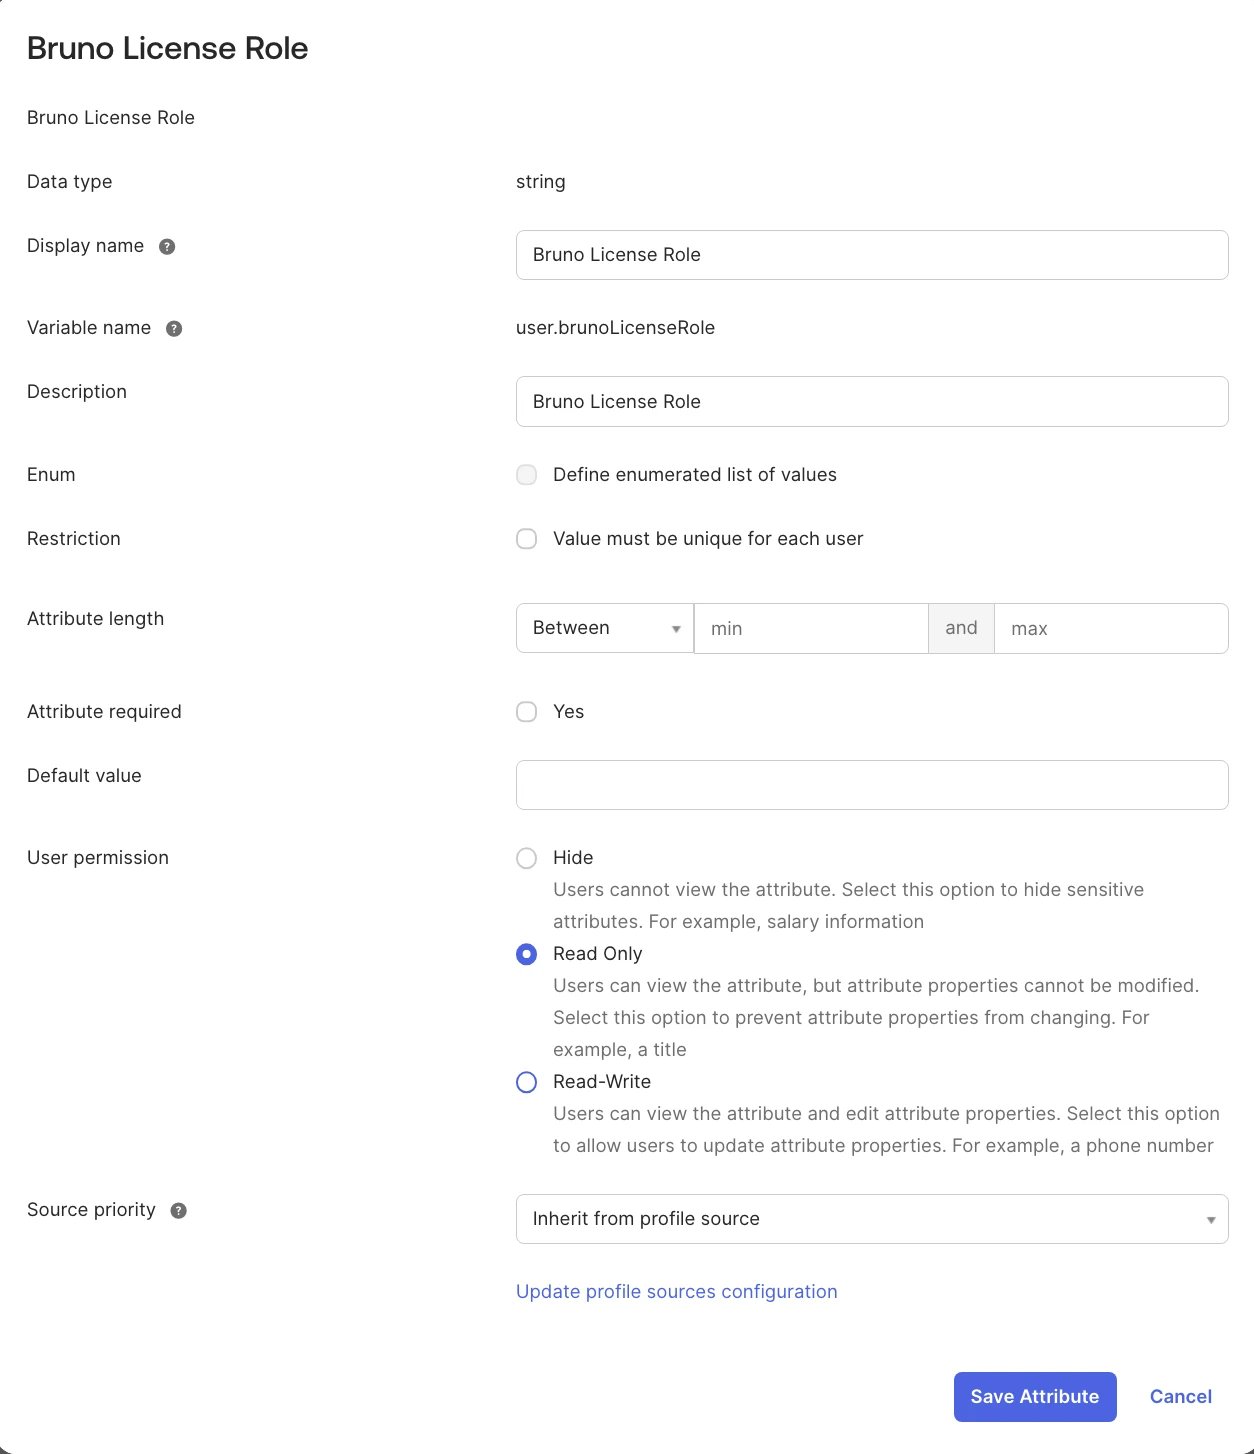 Do not check any "define enumerated list of values" / array option when creating this attribute. If it renders as a dropdown instead of a plain text box afterward, it was created as an enum with no options, and any value you set on a user's profile will be silently dropped. It must be a plain free-text string.
**2. Map the attribute to the roles field**
1. Go to your Bruno SCIM app → **Provisioning** → **To App** → **Attribute Mappings**
2. Find the `roles` row and click the pencil icon
3. Set **Attribute value** to **Expression** and enter:
```
user.brunoLicenseRole
```
4. Set **Apply on** to **Create and update**
5. Click **Save**
Do not check any "define enumerated list of values" / array option when creating this attribute. If it renders as a dropdown instead of a plain text box afterward, it was created as an enum with no options, and any value you set on a user's profile will be silently dropped. It must be a plain free-text string.
**2. Map the attribute to the roles field**
1. Go to your Bruno SCIM app → **Provisioning** → **To App** → **Attribute Mappings**
2. Find the `roles` row and click the pencil icon
3. Set **Attribute value** to **Expression** and enter:
```
user.brunoLicenseRole
```
4. Set **Apply on** to **Create and update**
5. Click **Save**
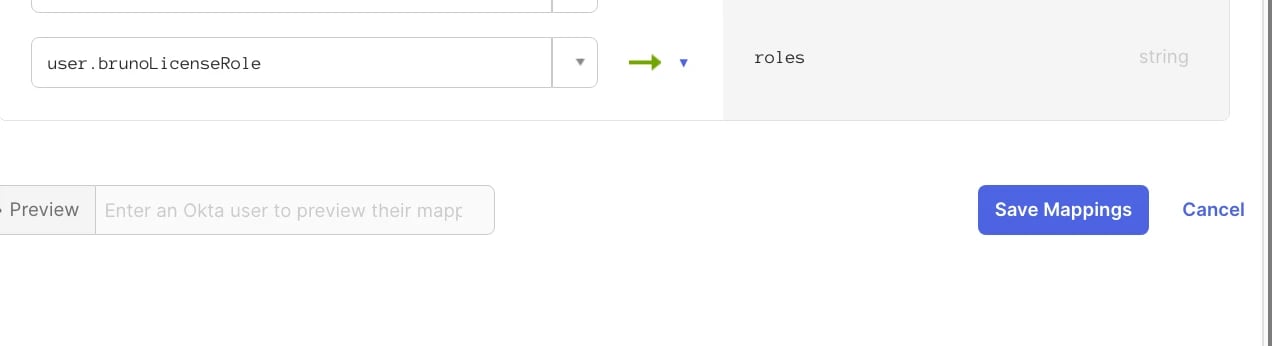 Use `user.brunoLicenseRole` (global profile), not `appuser.brunoLicenseRole`. Okta blocks same-profile attribute references in expression mappings.
**3. Set the role on users in Okta**
For each user you want to provision as a License Manager admin:
1. Go to **Directory → People → \[user] → Profile tab → Edit**
2. Find **Bruno License Role** and set the value to `bruno-admin` (or whatever you configured in Bruno)
3. Click **Save**
Use `user.brunoLicenseRole` (global profile), not `appuser.brunoLicenseRole`. Okta blocks same-profile attribute references in expression mappings.
**3. Set the role on users in Okta**
For each user you want to provision as a License Manager admin:
1. Go to **Directory → People → \[user] → Profile tab → Edit**
2. Find **Bruno License Role** and set the value to `bruno-admin` (or whatever you configured in Bruno)
3. Click **Save**
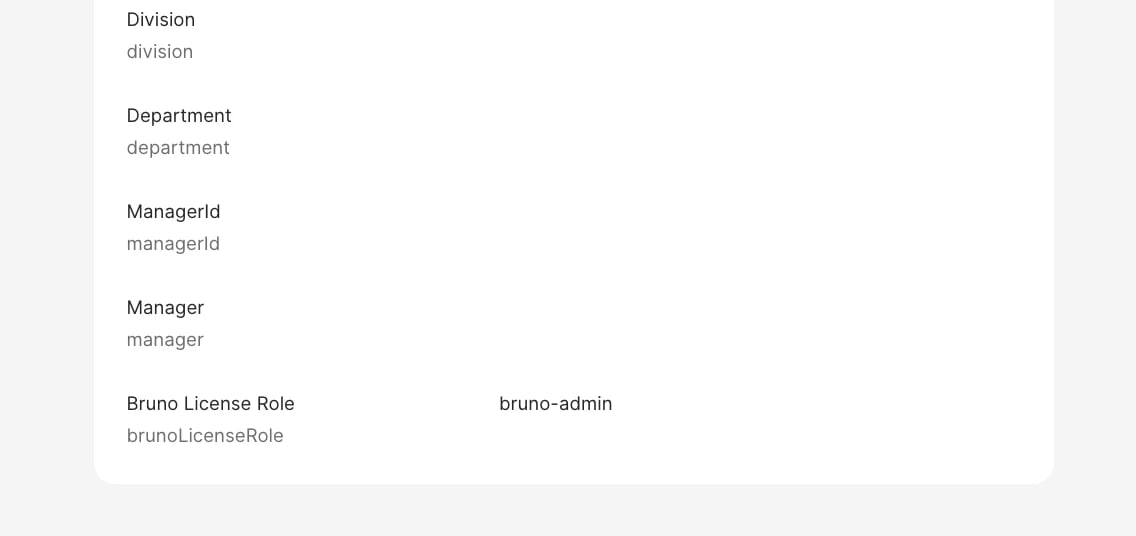 Leave **Bruno License Role** empty for users who should be provisioned as regular licensed users. Set this value before assigning the user to the app.
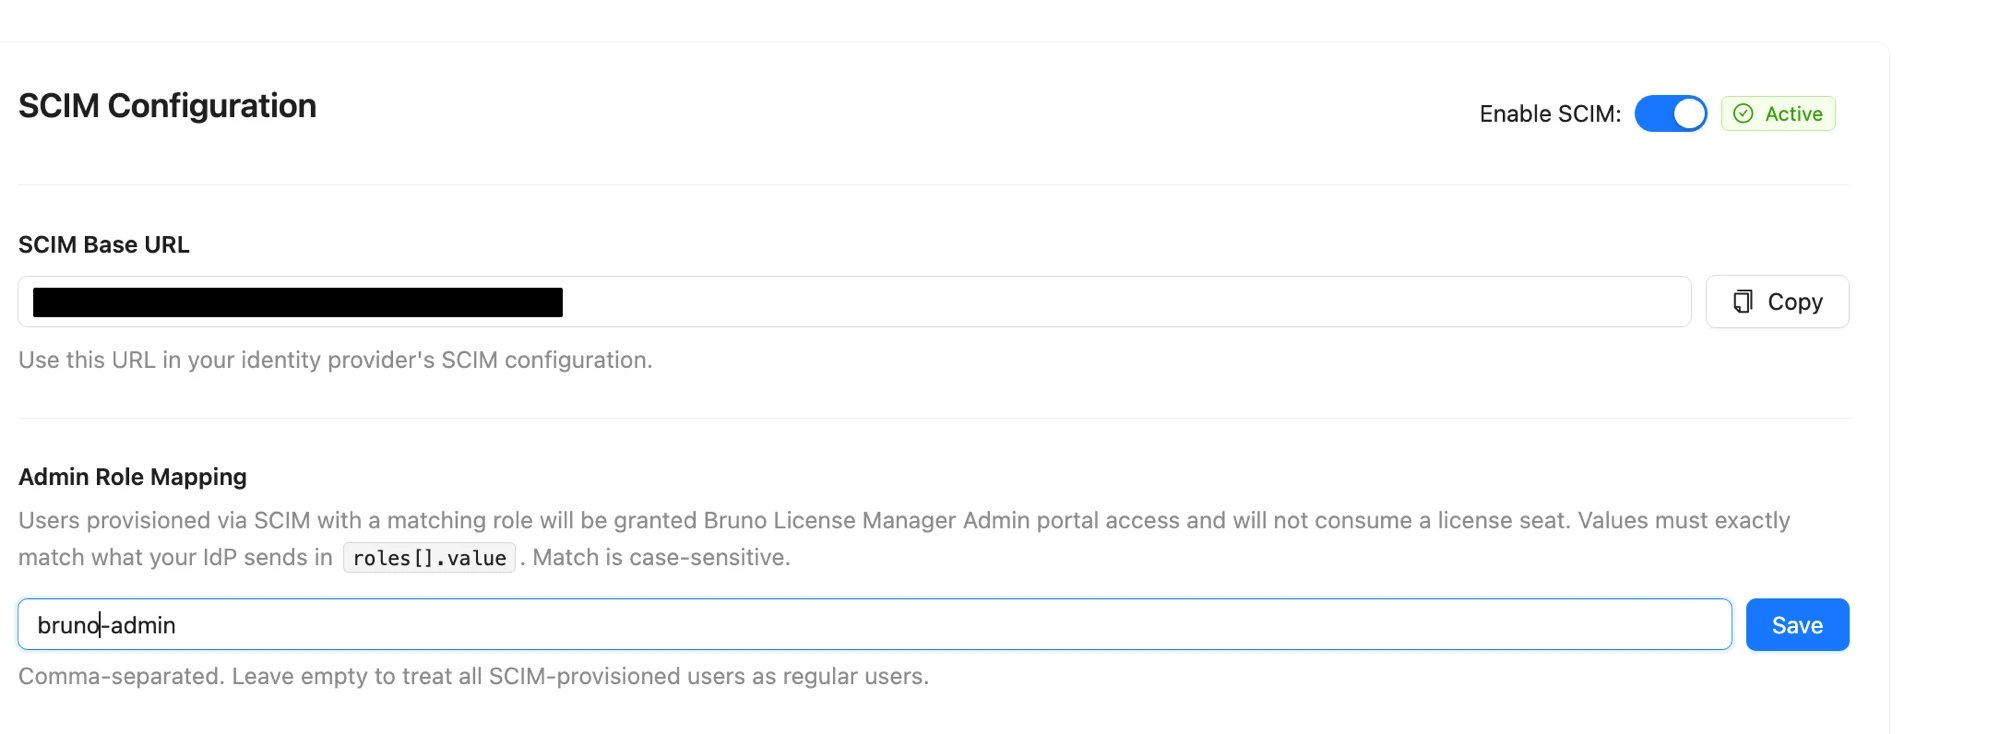
### Configure Admin Role Mapping in Bruno
1. In the Bruno LM portal, go to **Settings → SCIM → Admin Role Mapping**
2. Enter the role value(s) that should grant admin access, for example:
```
bruno-admin
```
3. Multiple values are supported comma-separated (e.g. `bruno-admin, admin`). Any match grants admin access.
4. Values must exactly match the role value Okta sends (case-sensitive)
5. Click **Save**
Leave **Bruno License Role** empty for users who should be provisioned as regular licensed users. Set this value before assigning the user to the app.
### Configure Admin Role Mapping in Bruno
1. In the Bruno LM portal, go to **Settings → SCIM → Admin Role Mapping**
2. Enter the role value(s) that should grant admin access, for example:
```
bruno-admin
```
3. Multiple values are supported comma-separated (e.g. `bruno-admin, admin`). Any match grants admin access.
4. Values must exactly match the role value Okta sends (case-sensitive)
5. Click **Save**
 ## Assign people and groups to Bruno in Okta
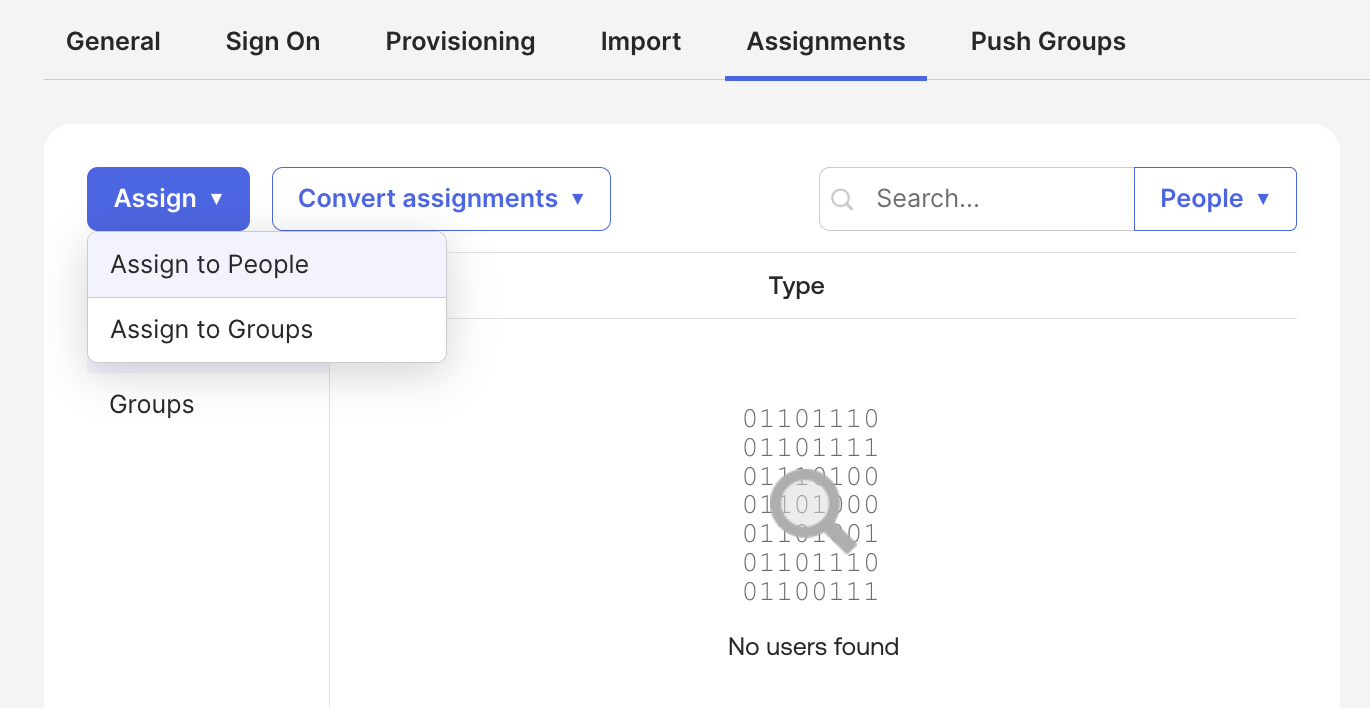
1. Under your created Bruno Application, navigate to the **Assignments** tab
2. Select **Assign** and either **Assign to People** or **Assign to Groups** to provision Bruno license keys. If you [configured Admin Role Mapping](#configure-admin-role-mapping), make sure the user's admin role will be included in the account creation request — with [Option A](#option-a-resolve-from-group-membership-recommended) add them to the admin group first, and with [Option B](#option-b-read-a-stored-profile-attribute) set their **Bruno License Role** attribute first
## Assign people and groups to Bruno in Okta
1. Under your created Bruno Application, navigate to the **Assignments** tab
2. Select **Assign** and either **Assign to People** or **Assign to Groups** to provision Bruno license keys. If you [configured Admin Role Mapping](#configure-admin-role-mapping), make sure the user's admin role will be included in the account creation request — with [Option A](#option-a-resolve-from-group-membership-recommended) add them to the admin group first, and with [Option B](#option-b-read-a-stored-profile-attribute) set their **Bruno License Role** attribute first
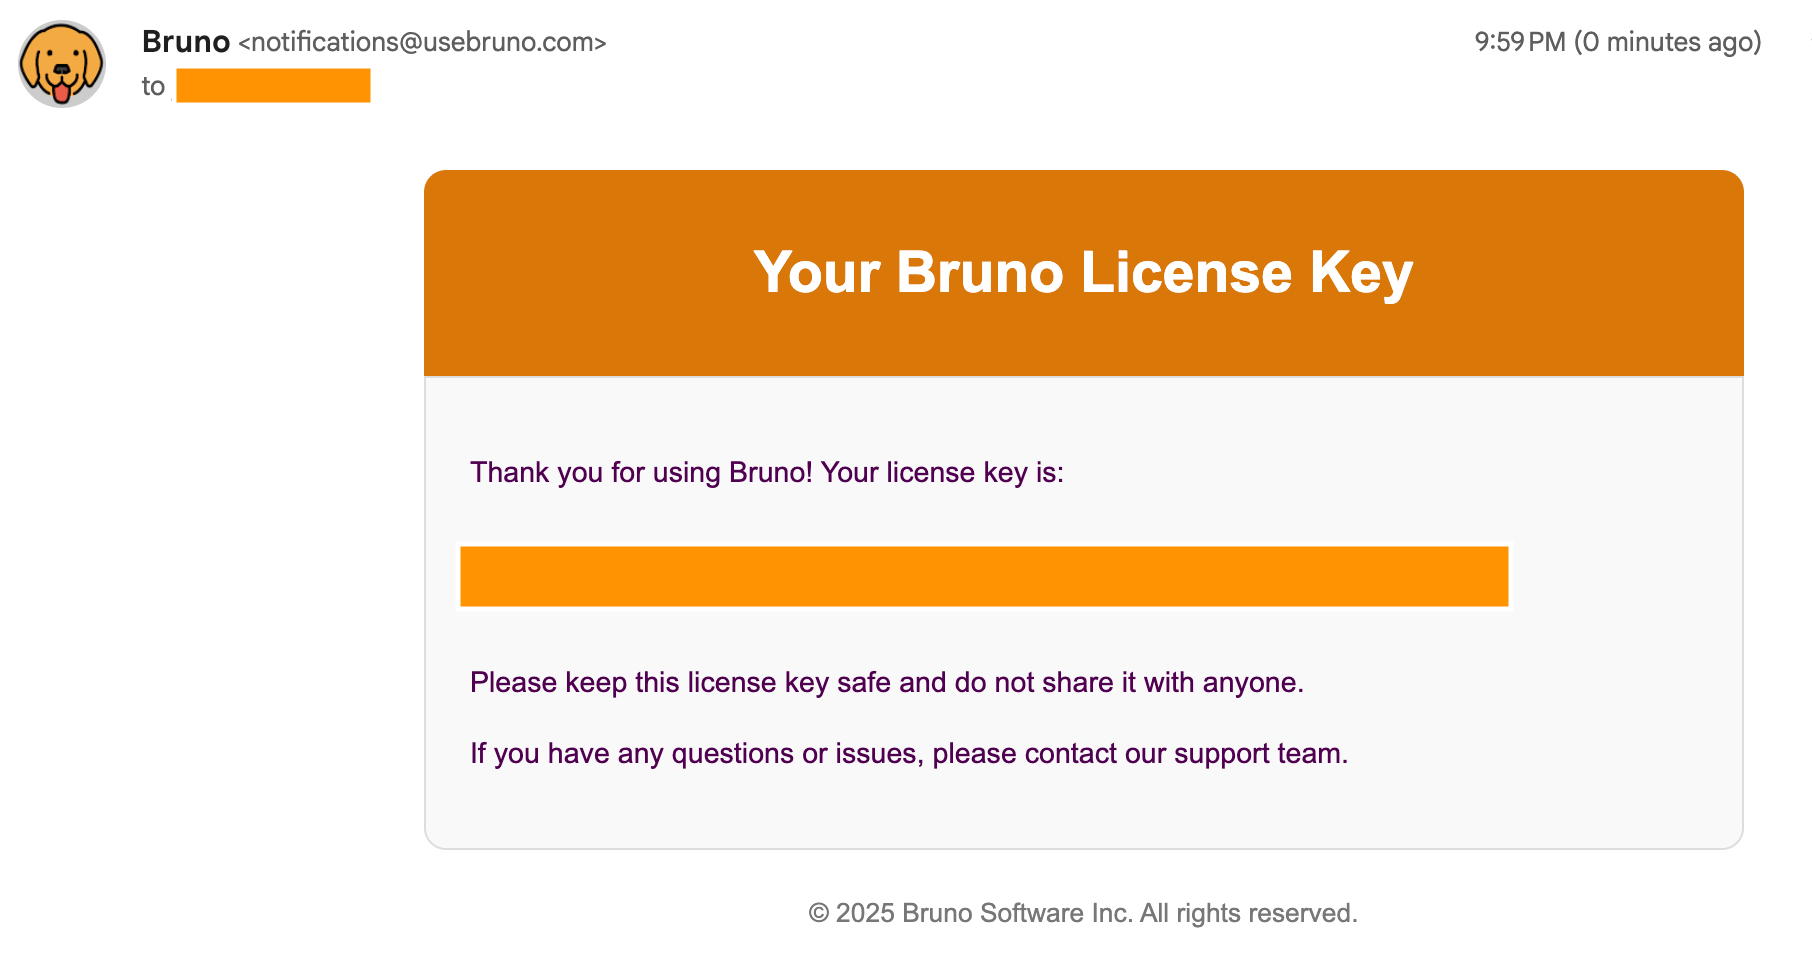
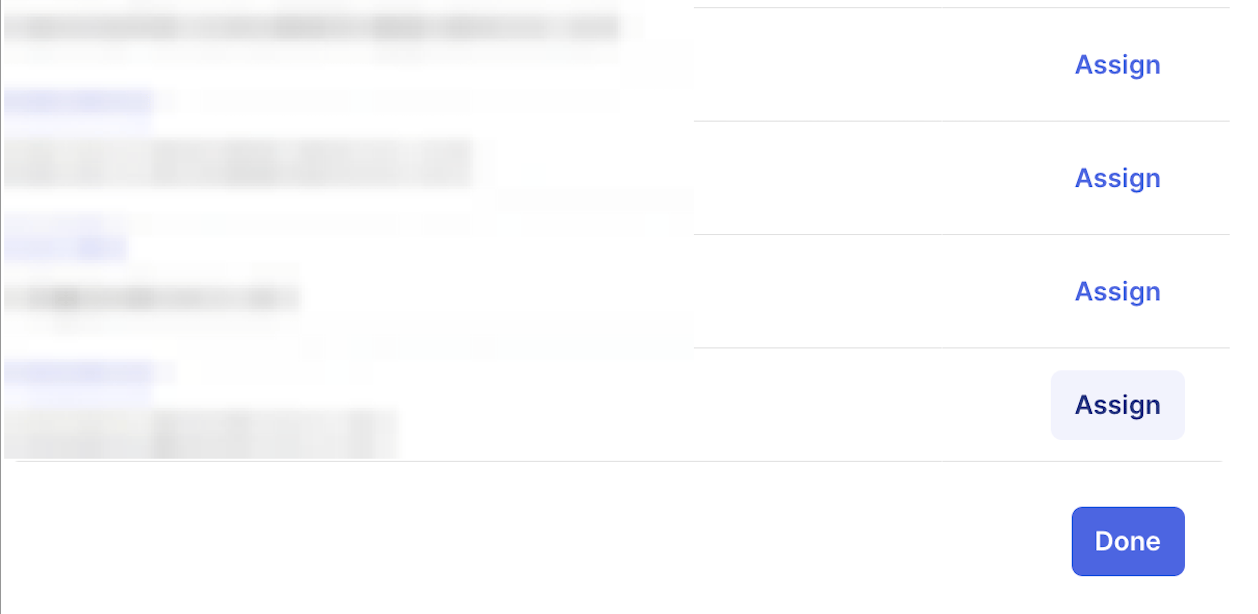 3. Assigned users with a matching admin role get portal access directly, with no license key or email. All other assigned users receive an email with their **License Key**
 ### Verify an administrator provisioned correctly
After assigning the user:
1. In the Bruno portal, confirm they appear under **Settings → Admins**
2. Confirm they do **not** appear in the **Users** list
If they appear in the **Users** list with a license, the role was not present when the account was created. See [Troubleshooting](#troubleshooting).
## Deprovision users from Bruno in Okta
1. Under your created Bruno Application, navigate to the **Assignments** tab
### Verify an administrator provisioned correctly
After assigning the user:
1. In the Bruno portal, confirm they appear under **Settings → Admins**
2. Confirm they do **not** appear in the **Users** list
If they appear in the **Users** list with a license, the role was not present when the account was created. See [Troubleshooting](#troubleshooting).
## Deprovision users from Bruno in Okta
1. Under your created Bruno Application, navigate to the **Assignments** tab
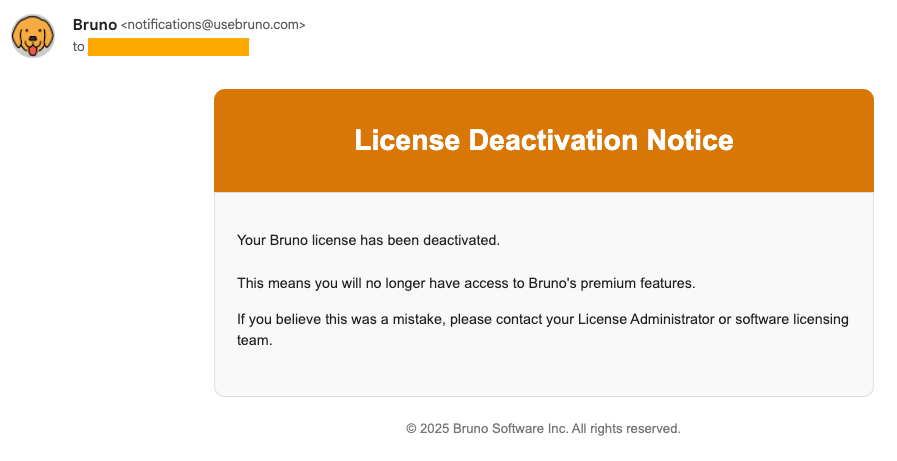
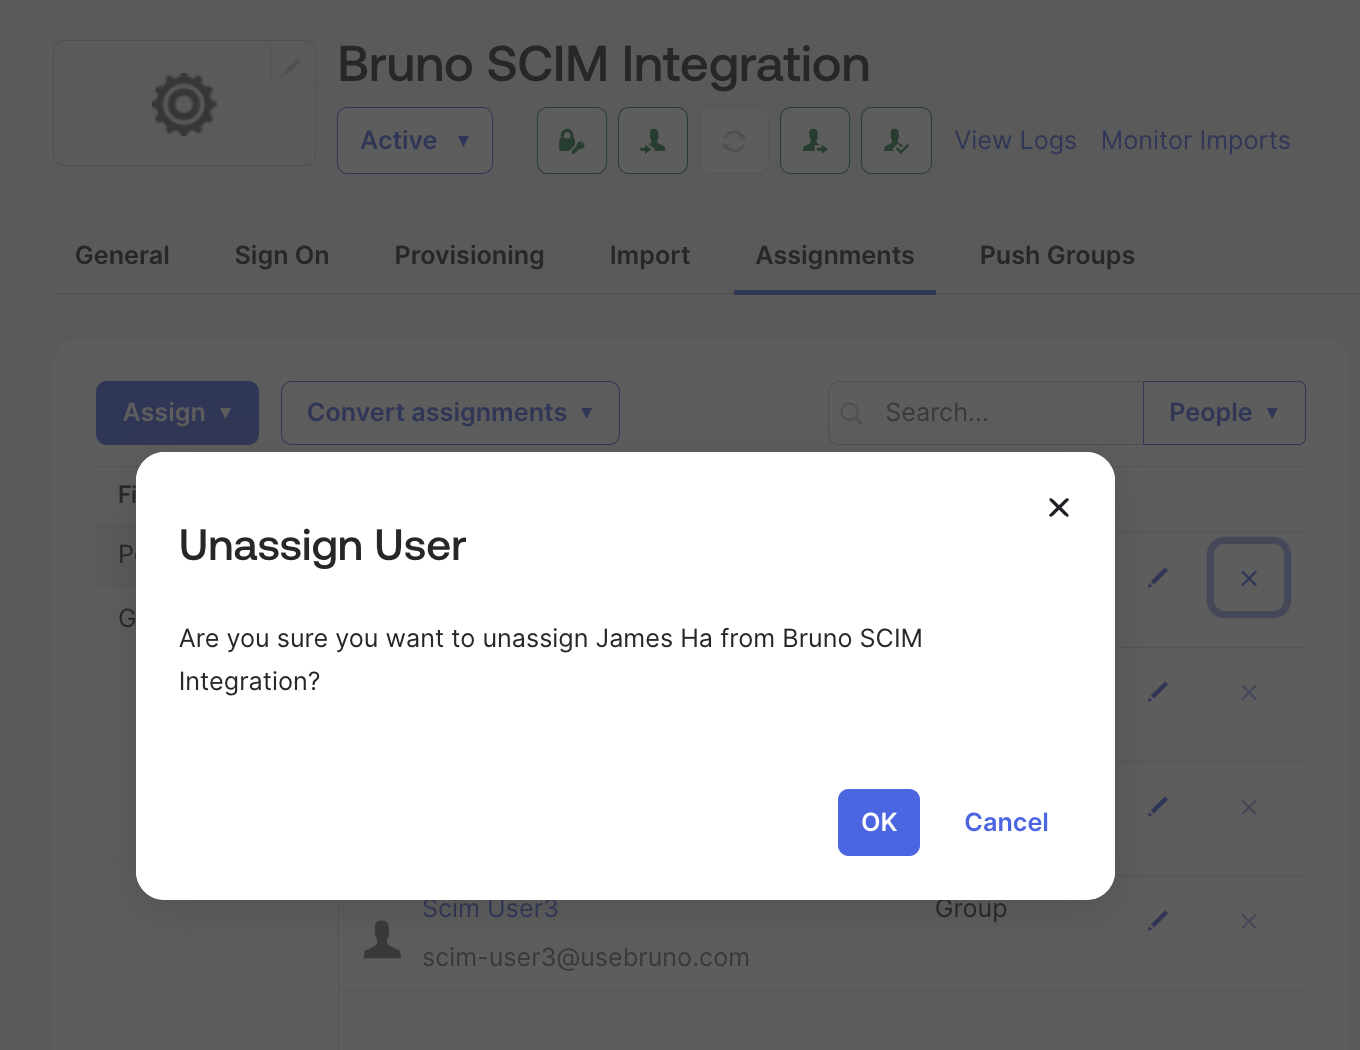 2. Remove the desired users or groups, their license key(s) will be deactivated and they will receive an email notification
 ## Troubleshooting
### A user was provisioned as a licensed user instead of an administrator
The role value was not included when Okta created the account.
To confirm, open **Reports** → **System Log** and filter to the user and the Bruno app. Compare the timestamp of **Push new user to external application** against **Updated user application property**. If the property update is later, the account was created before the role value resolved.
To prevent it for future users, switch to the group-membership expression in [Option A](#option-a-resolve-from-group-membership-recommended).
To correct an affected user, remove their license under **Users** in the Bruno portal. Their administrator access is tracked separately and is unaffected.
Re-provisioning the user through Okta does not remove the license. Removing and re-adding the app assignment preserves the existing license, so the license must be removed in the portal.
### An administrator also appears in the Users list with a license
Same cause and same remedy as above — the user was created as a licensed user before the admin role reached Bruno, then promoted.
### Admin Role Mapping appears to have no effect
* Confirm **Enable SCIM** is on under **Settings → SCIM Provisioning** — the Admin Role Mapping field is only shown when SCIM is enabled
* Confirm the value matches what Okta sends, **exactly and case-sensitively**
* Confirm the `roles` attribute is present in the outbound request, via **Reports** → **System Log**
* Confirm the attribute's external namespace is `urn:ietf:params:scim:schemas:core:2.0:User`. If Okta assigned an app-specific namespace, the value is sent under that namespace instead and Bruno will not read it
### A provisioned administrator does not appear in the Users list
Expected. Administrators provisioned via SCIM do not consume a license seat and do not appear in the **Users** list. They appear under **Settings → Admins**.
## Related Resources
For more information about configuring SCIM provisioning with Okta, refer to these Okta documentation resources:
* [Add SCIM provisioning to app integrations](https://help.okta.com/en-us/content/topics/apps/apps_app_integration_wizard_scim.htm) - Step-by-step guide for adding SCIM provisioning to Okta applications
* [SCIM 2.0 protocol overview](https://help.okta.com/en-us/content/topics/provisioning/opp/opp-provision-scim-messages.htm) - Reference for SCIM 2.0 messages and provisioning operations
* [On-premises provisioning with SCIM](https://help.okta.com/en-us/content/topics/provisioning/opp/opp-architecture.htm) - Architecture and setup for SCIM provisioning
* [Test SCIM connectors](https://help.okta.com/en-us/content/topics/provisioning/opp/opp-test-scim-server.htm) - Guide for testing SCIM connectors and servers
* [Okta provisioning documentation](https://help.okta.com/en-us/content/topics/provisioning/provisioning.htm) - Comprehensive provisioning documentation and best practices
## Troubleshooting
### A user was provisioned as a licensed user instead of an administrator
The role value was not included when Okta created the account.
To confirm, open **Reports** → **System Log** and filter to the user and the Bruno app. Compare the timestamp of **Push new user to external application** against **Updated user application property**. If the property update is later, the account was created before the role value resolved.
To prevent it for future users, switch to the group-membership expression in [Option A](#option-a-resolve-from-group-membership-recommended).
To correct an affected user, remove their license under **Users** in the Bruno portal. Their administrator access is tracked separately and is unaffected.
Re-provisioning the user through Okta does not remove the license. Removing and re-adding the app assignment preserves the existing license, so the license must be removed in the portal.
### An administrator also appears in the Users list with a license
Same cause and same remedy as above — the user was created as a licensed user before the admin role reached Bruno, then promoted.
### Admin Role Mapping appears to have no effect
* Confirm **Enable SCIM** is on under **Settings → SCIM Provisioning** — the Admin Role Mapping field is only shown when SCIM is enabled
* Confirm the value matches what Okta sends, **exactly and case-sensitively**
* Confirm the `roles` attribute is present in the outbound request, via **Reports** → **System Log**
* Confirm the attribute's external namespace is `urn:ietf:params:scim:schemas:core:2.0:User`. If Okta assigned an app-specific namespace, the value is sent under that namespace instead and Bruno will not read it
### A provisioned administrator does not appear in the Users list
Expected. Administrators provisioned via SCIM do not consume a license seat and do not appear in the **Users** list. They appear under **Settings → Admins**.
## Related Resources
For more information about configuring SCIM provisioning with Okta, refer to these Okta documentation resources:
* [Add SCIM provisioning to app integrations](https://help.okta.com/en-us/content/topics/apps/apps_app_integration_wizard_scim.htm) - Step-by-step guide for adding SCIM provisioning to Okta applications
* [SCIM 2.0 protocol overview](https://help.okta.com/en-us/content/topics/provisioning/opp/opp-provision-scim-messages.htm) - Reference for SCIM 2.0 messages and provisioning operations
* [On-premises provisioning with SCIM](https://help.okta.com/en-us/content/topics/provisioning/opp/opp-architecture.htm) - Architecture and setup for SCIM provisioning
* [Test SCIM connectors](https://help.okta.com/en-us/content/topics/provisioning/opp/opp-test-scim-server.htm) - Guide for testing SCIM connectors and servers
* [Okta provisioning documentation](https://help.okta.com/en-us/content/topics/provisioning/provisioning.htm) - Comprehensive provisioning documentation and best practices